Display
- X Series
- VN Series
- RS / RS+ Series
Software
- Newline Cast
- Newline Launch Control
- IdeaMax
Accessory & Other
Newline Reactiv SUITE
- Get Started
- Configuring
- General Navigation
- STAGE
- SCRIBBLE
- CONNECT
Reactiv SUITE allows you to open, work and present with many file natively- Word, PowerPoint, Excel, PDF, JPEG, GIF, MPEG4, and so on.
All pictures* (JPG, BMP, PNG, JIFF, etc.) All movies (MP4, AVI, MPEG, etc.)
Microsoft Office files** (DOCX, PPTX, XLSX) PDF
Weblinks
*Required codecs must be installed.
**Microsoft Office must be installed.
Newline Reactiv SUITE is revolutionizing the way professionals express their ideas, while allowing passive audiences to become active participants and interact as a team. This transforms everyday meetings resulting in greater engagement and productivity.
Reactiv STAGE | Re-Imagining Presentations
Elevate your presentations and become a storyteller. Imagine a ‘Digital Table’ on which you can present any combination of content – like pictures, decks, documents, videos, websites – in order to weave your story.
Content can be displayed, organized, manipulated and annotated easily and independently of its file format.
Dramatically improves the speed and the accuracy of capturing audience feedback and meeting results.
Whether you are giving a lecture, training a team, pitching a product to your clients, Reactiv STAGE will get your message through.
- Focus Attention
- Present
- Markup & Archive
- Discuss
- Easily Compare
Reactiv SCRIBBLE | Re-imagining Ideation
Convert your passive audiences into active participants and contributors who can ideate on an infinite canvas. Imagine a ‘Digital Wall’ on which all participants can have their voice, ideas and opinions captured.
Content can be ‘pinned’ where pages can be ripped out, arranged and inked upon. At the end of the meeting, organize and paginate your work and share effortlessly with everyone.
Simplifies complex ideas, visually communicates concepts and intent, and allows teams to capture decisions and reduce mistakes.
Whether you are teaching a class, creating a marketing campaign or involved in a detailed engineering design session, Reactiv SCRIBBLE will allow your ideas to be presented.
- Brainstorm, Sketch and Draw
- Create Layout
- Manage Projects
- Infinity Canvas
- Export & Share Layouts
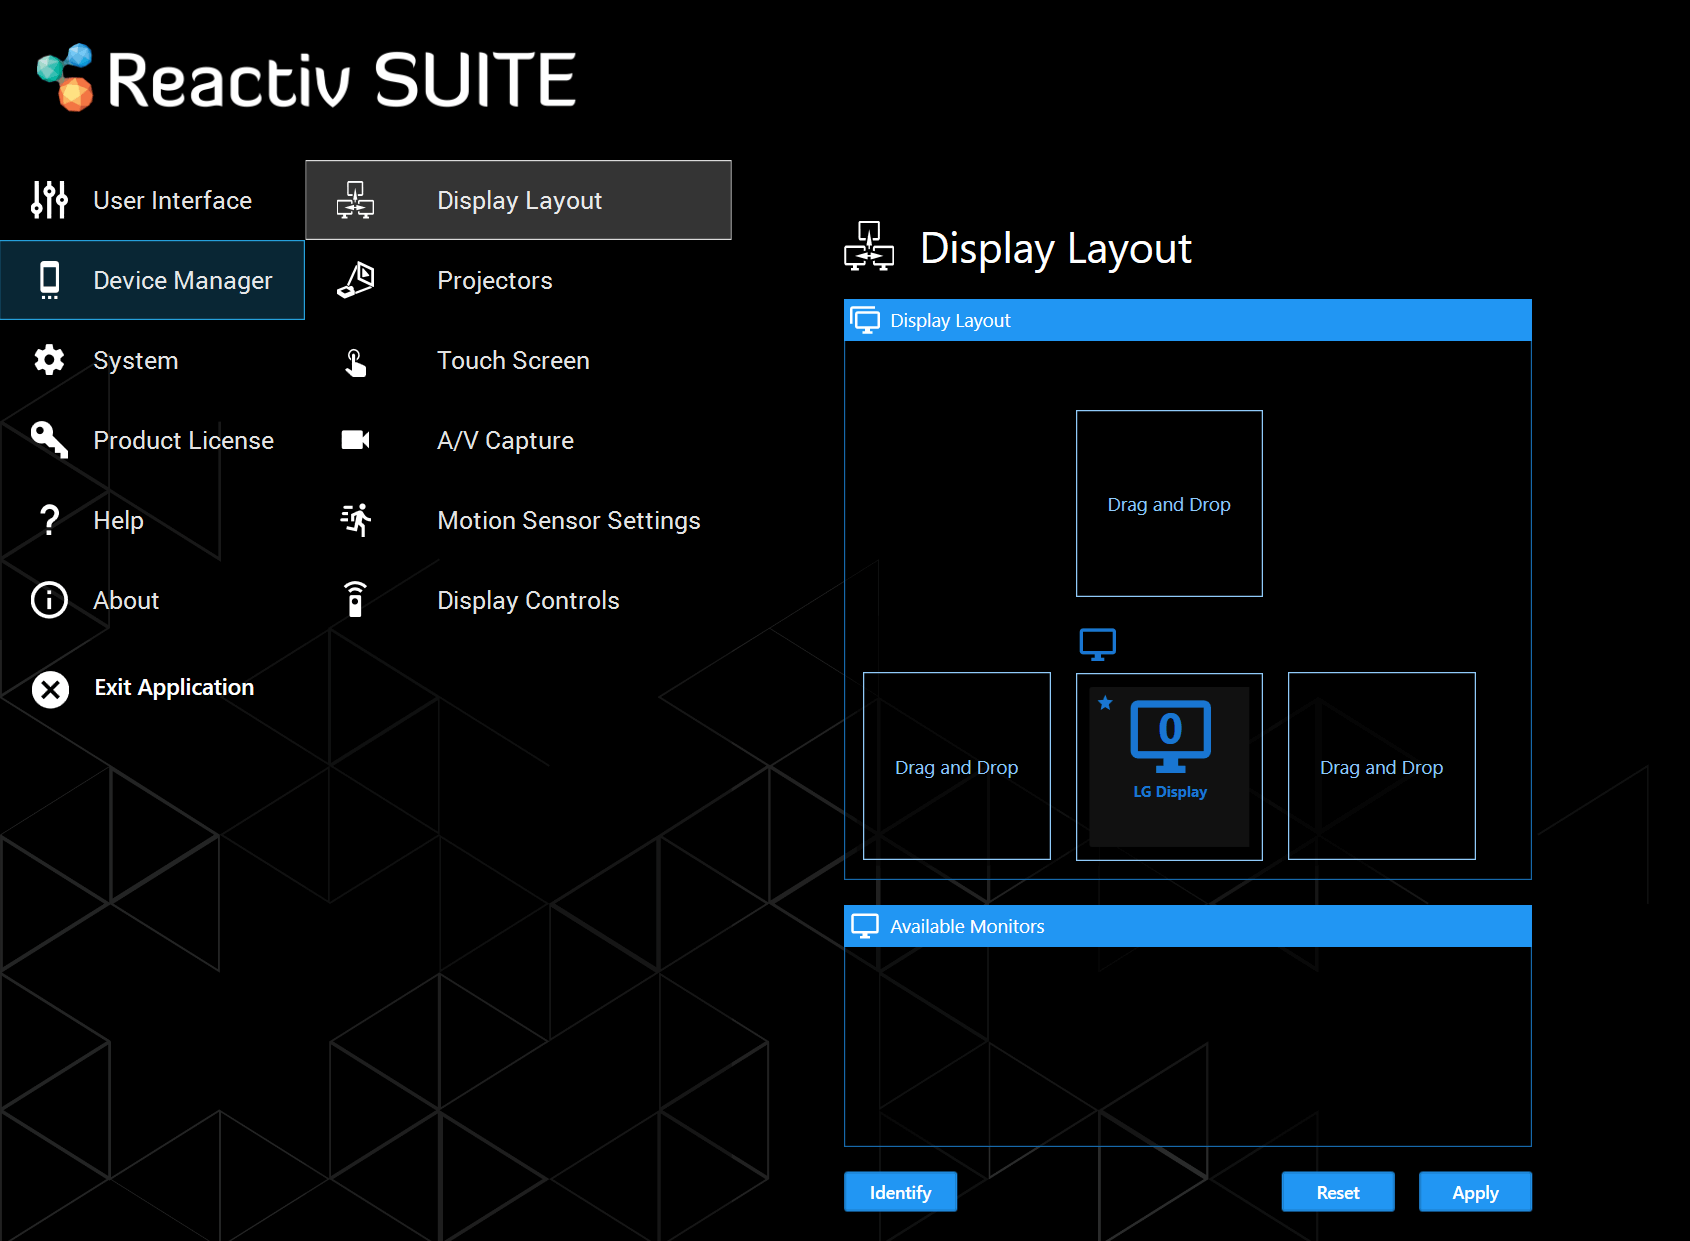
- Connect up to 3 additional displays to the Newline Reactiv SUITE
- In Newline Reactiv SUITE settings > device Manager > Display Layout, configure the position of your secondary displays. Just select the available display and drop it into the position on the layout for Reactiv SUITE to take control. The location of the display represents the ‘throw’ direction of the content. Just throw content right, left or up, and the content will appear on the appropriate display as per the layout map.
- Verify Windows recognizes the secondary display. In Windows, right click on your desktop, select “displays settings”, and confirm that the secondary displays is detected.
- If the secondary displays is not detected by Windows, try to disconnect and reconnect the display, or change the cables.

Newline Reactiv SUITE requires Microsoft Office to be installed and activated on the computer running the software in order to open documents such as Word, PowerPoint or Excel.
Ensure that you are not running a 30 day free trial and your license is valid and not expired.
- In Windows, open any Office app (Excel, PowerPoint, Word…).
- Go “Files” > “account” > and verify that the product is activated.
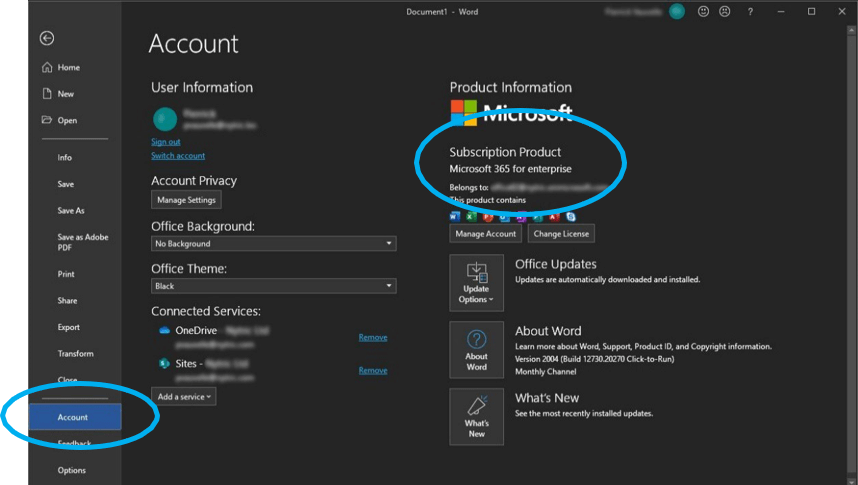
- If the account is not activated, you will need to contact your IT department to activate it or to purchase a new license.
Newline Reactiv SUITE is by default configured to be in full screen “kiosk mode” by your IT department.
Otherwise, go in Settings > user Interface > Additional Settings and click on “toggle fullscreen mode”.
UI Customization
In Newline Reactiv SUITE settings → User Interface → Accent color
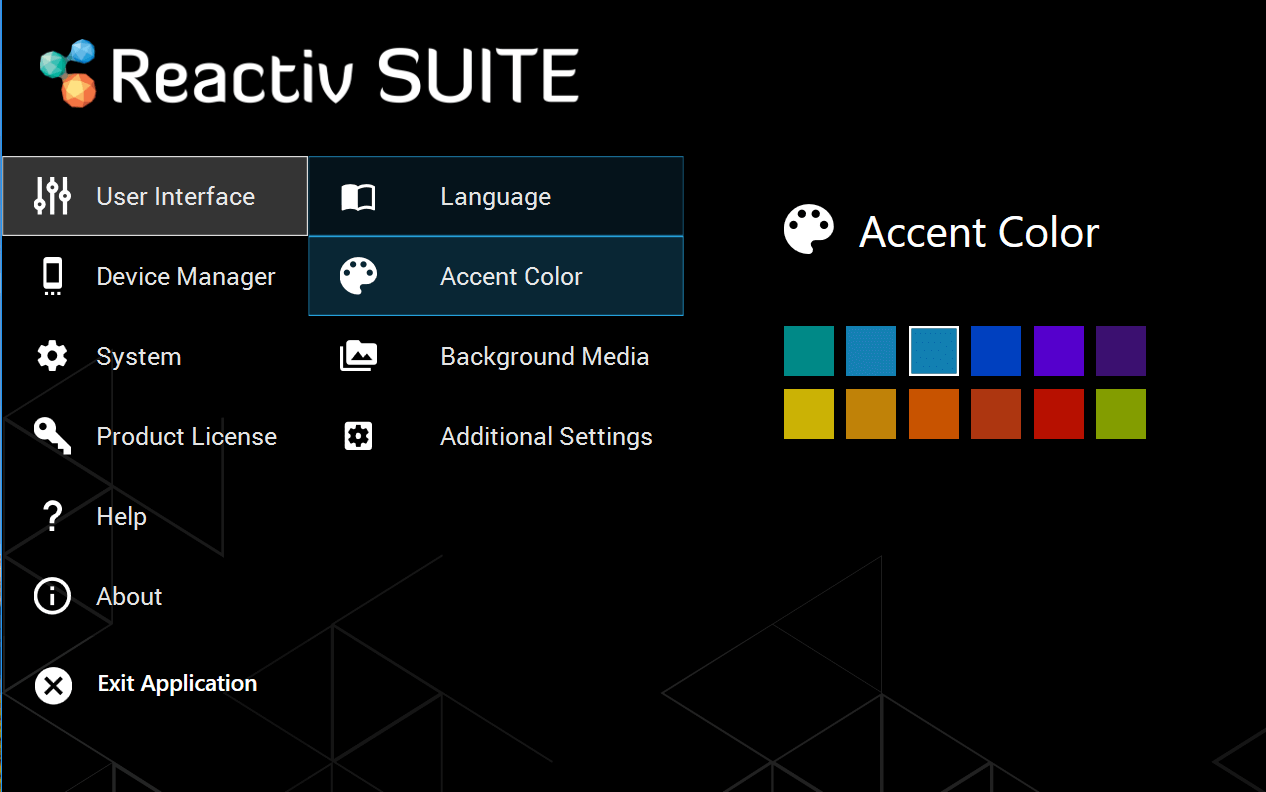
Yes, in the settings > User Interface > Background Media
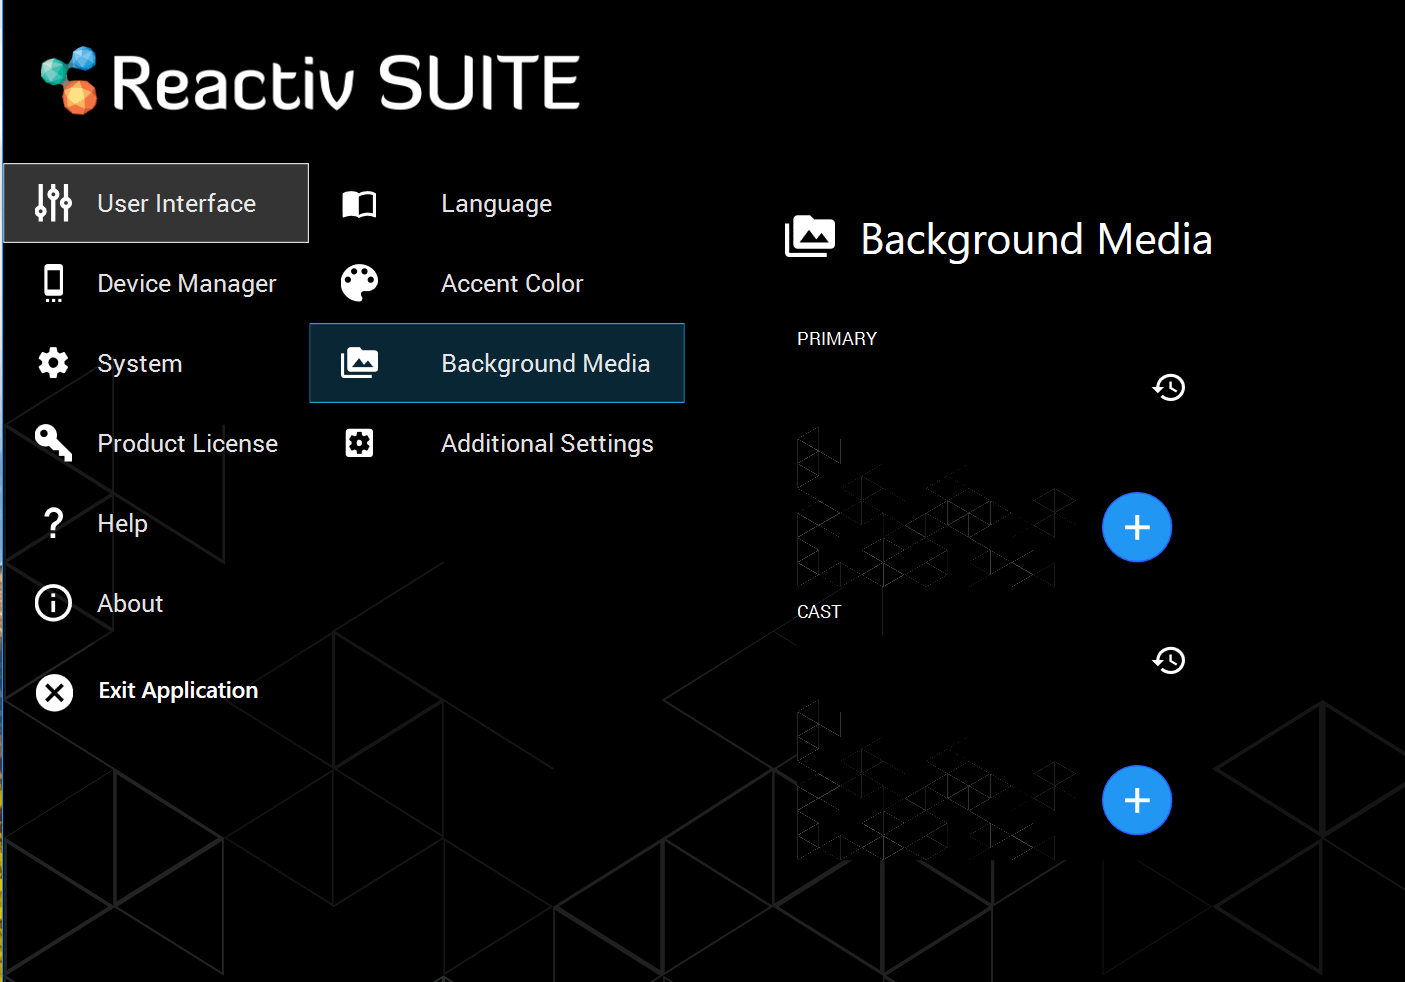
Move any image into the presentation folder, and rename it “folder.jpg”, that picture will become the presentation thumbnail.
Any sub-folder, inside the presentation, can also be customized by placing a “folder.jpg” file within it.
Move any picture into the presentation folder and rename it “background.jpg”, that picture will become the presentation background in STAGE.
Any sub-folder, inside the presentation, can also be customized by placing a “background.jpg” file within it.
- On the Home screen, select Reactiv STAGE or Reactiv SCRIBBLE.
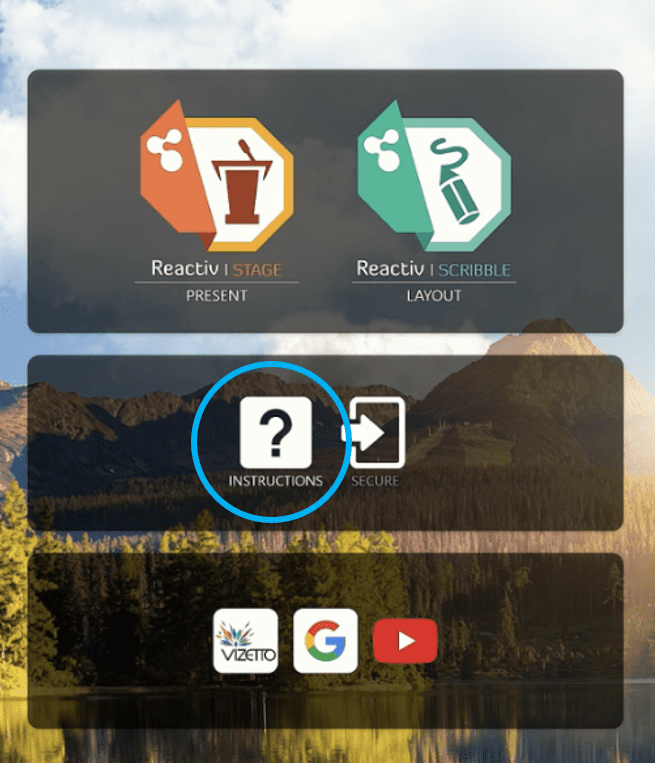
- From the Lobby (Public or Private Workspaces), you can start a presentation just by clicking on any of the icons.
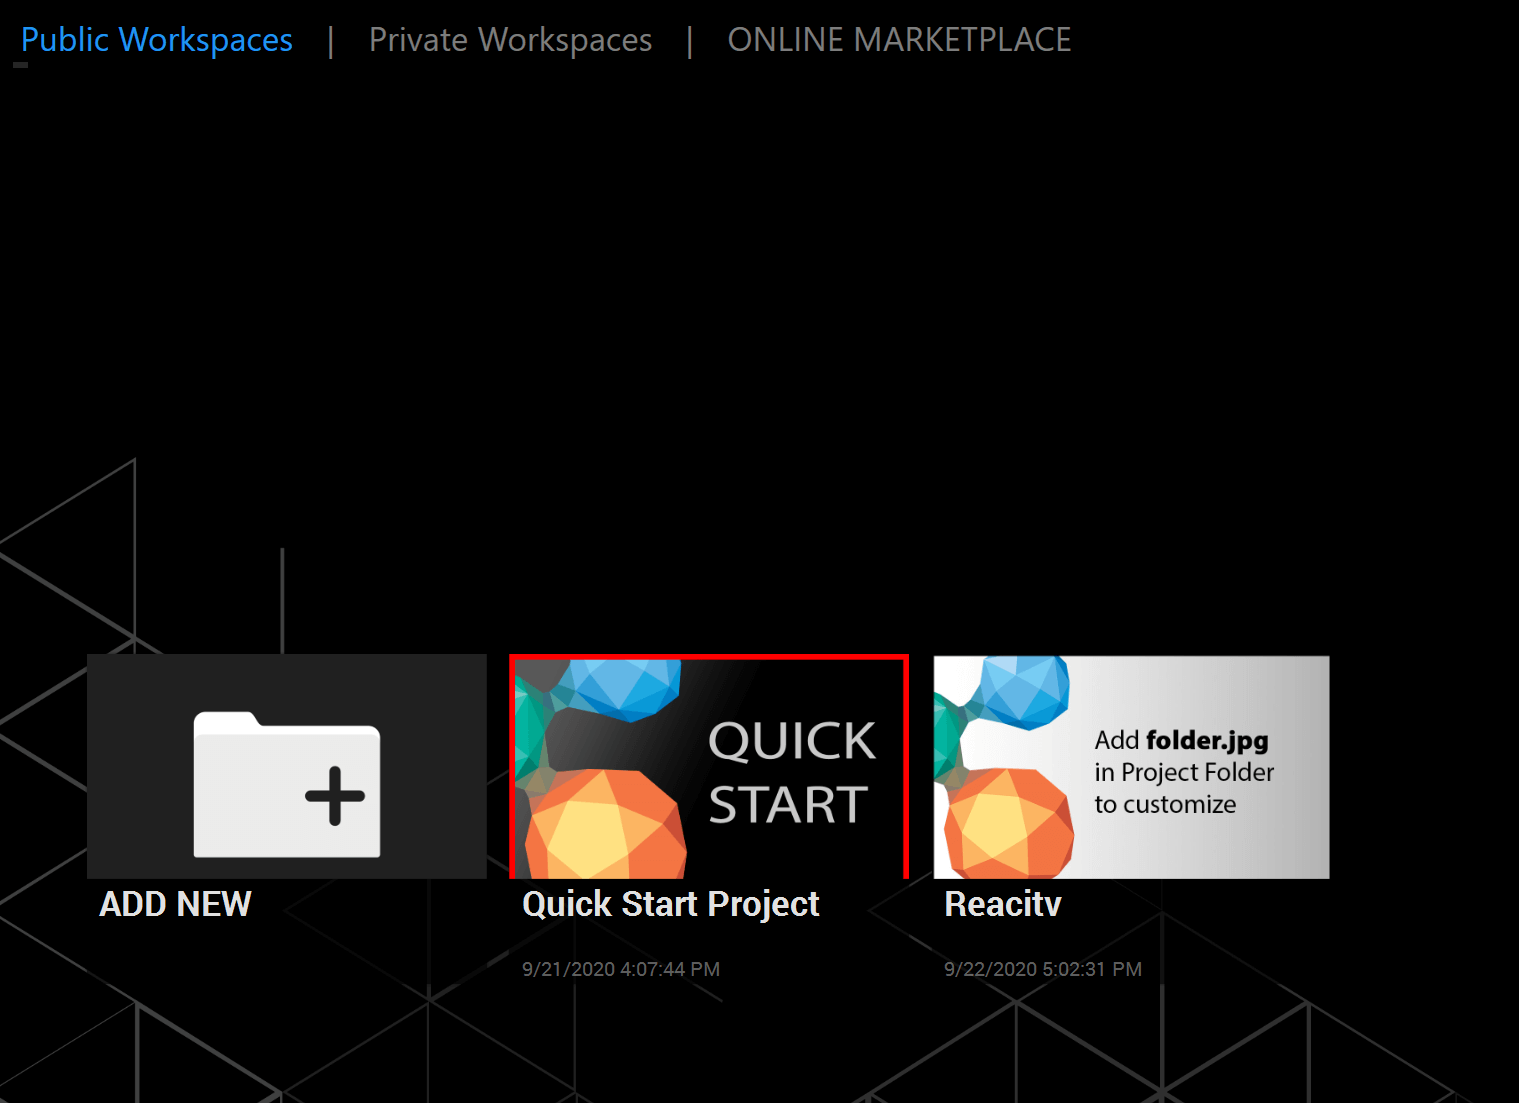
- On the Home screen, select Reactiv STAGE or Reactiv SCRIBBLE.
- From the Lobby (Public or Private Workspaces), you can add new workspaces by clicking on the ‘+’ icon.
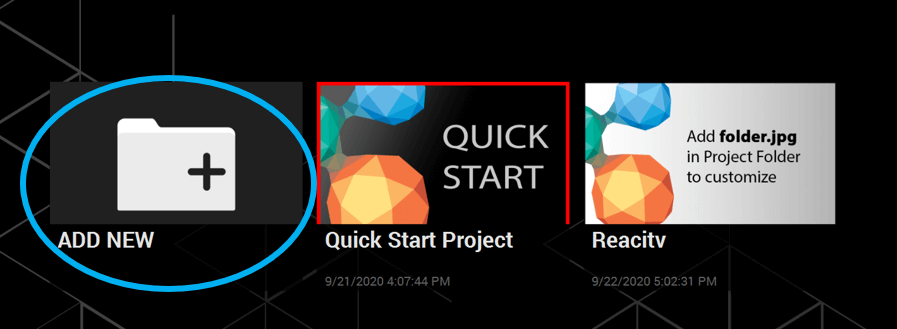
- In Details:
- Enter a title and a description.
- Add a folder with the desired files to use in the Workspace by clicking on the ‘+’ button.
- In Media:
- Add images as the preview and background media by clicking on ‘+’
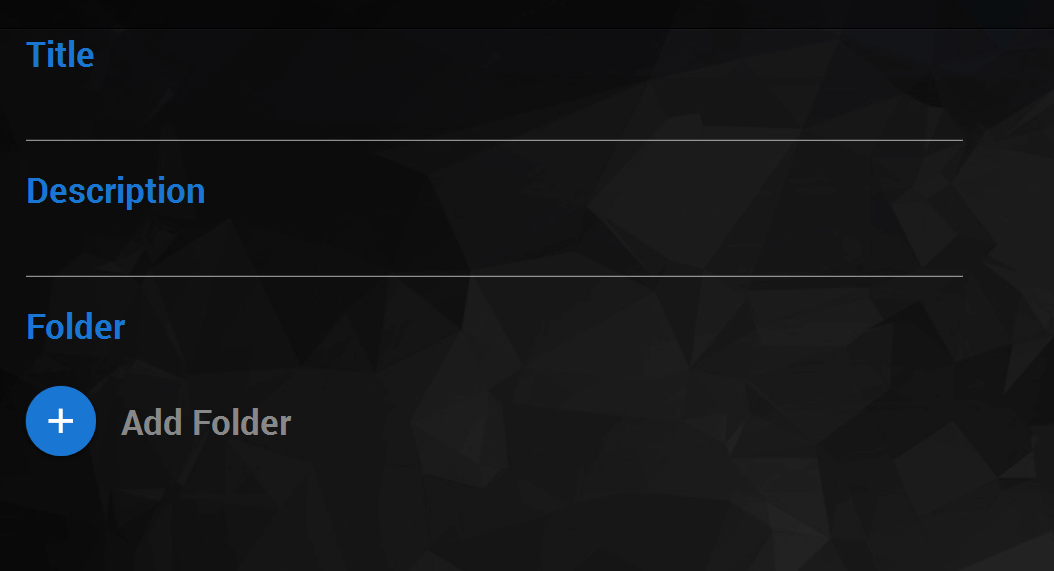
- Click on Save. Select your Workspace on the Lobby screen and start presenting.
- On the home screen, click on the help button, ‘?’ to see mini video-tutorials explaining the basic gestures and features.

- In a presentation, click on the interrogation mark in the bottom right corner to see mini video-tutorials.

- Use your USB key to automatically start a project.
- Prepare your files in a USB flash drive.
- Plug your USB flash drive into the interactive display.
- Ensure that USB drive is enabled in SETTINGS.
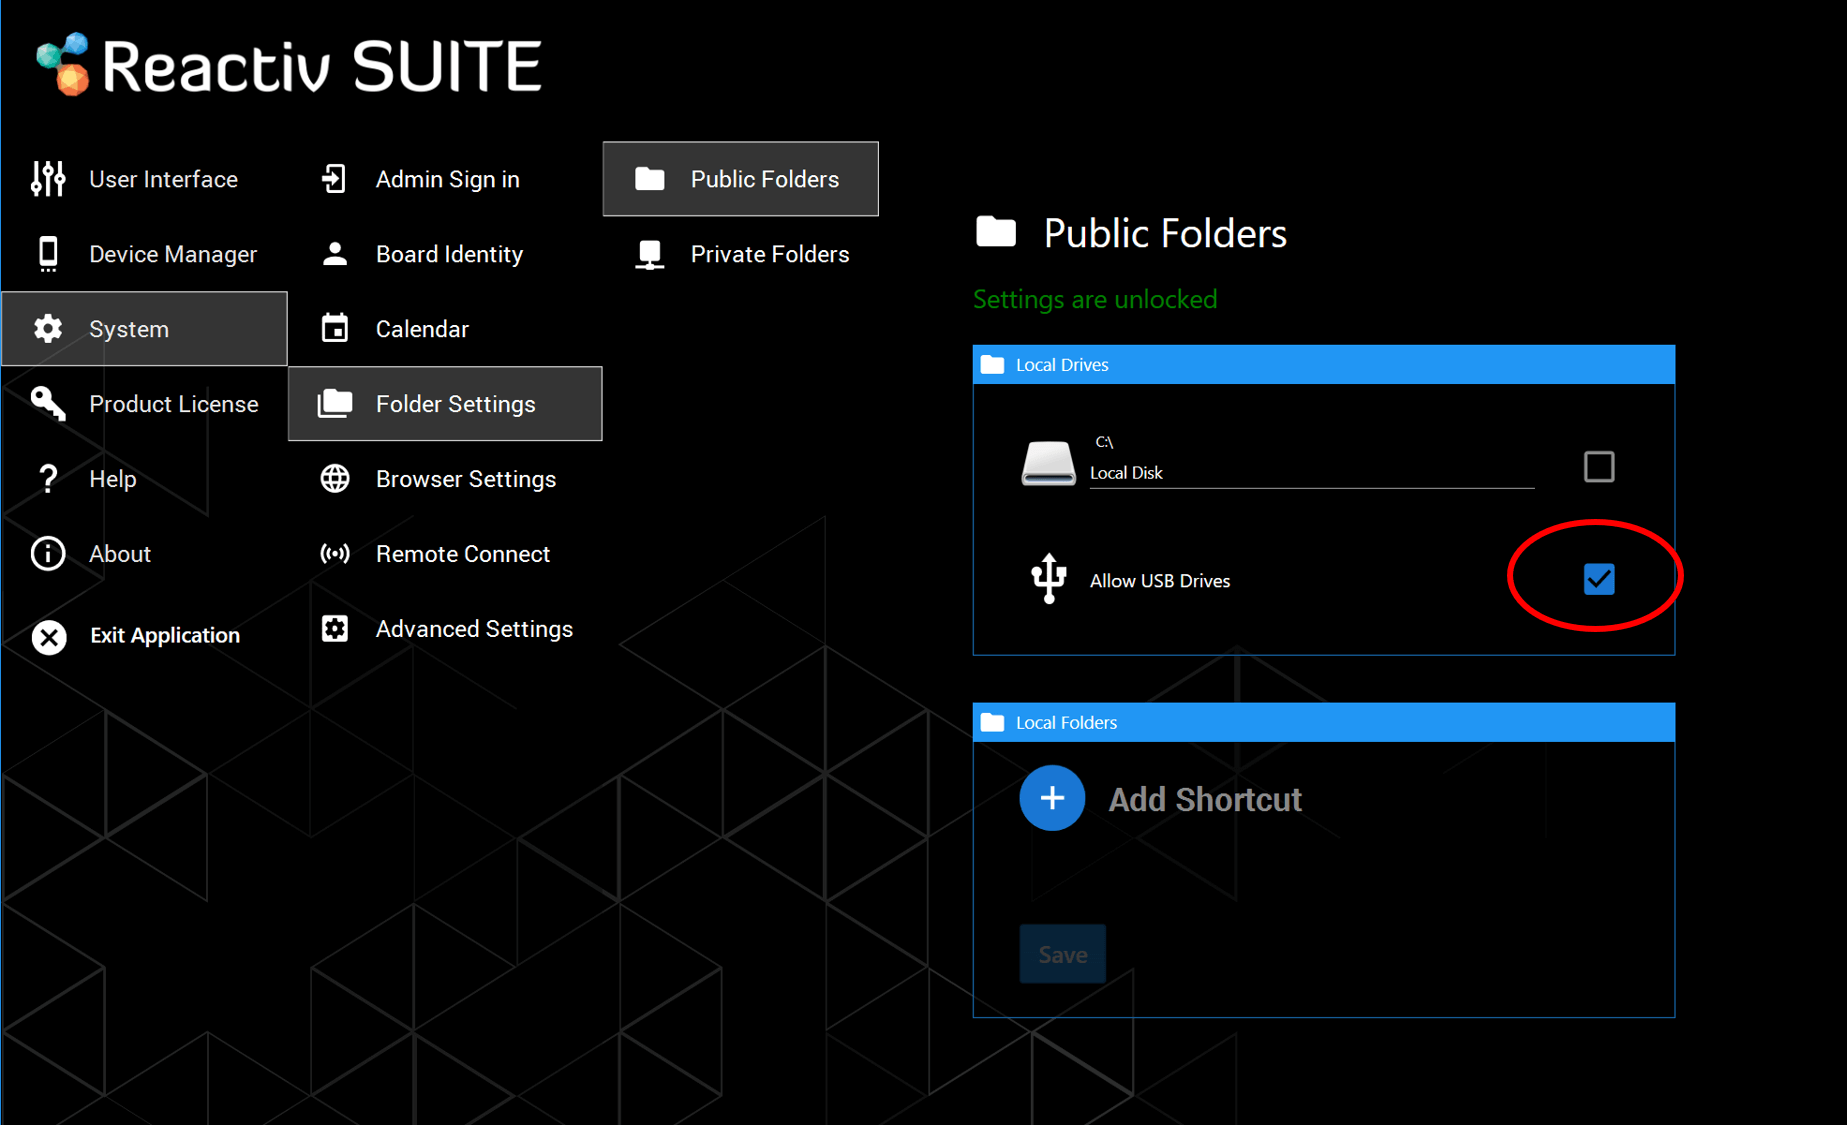
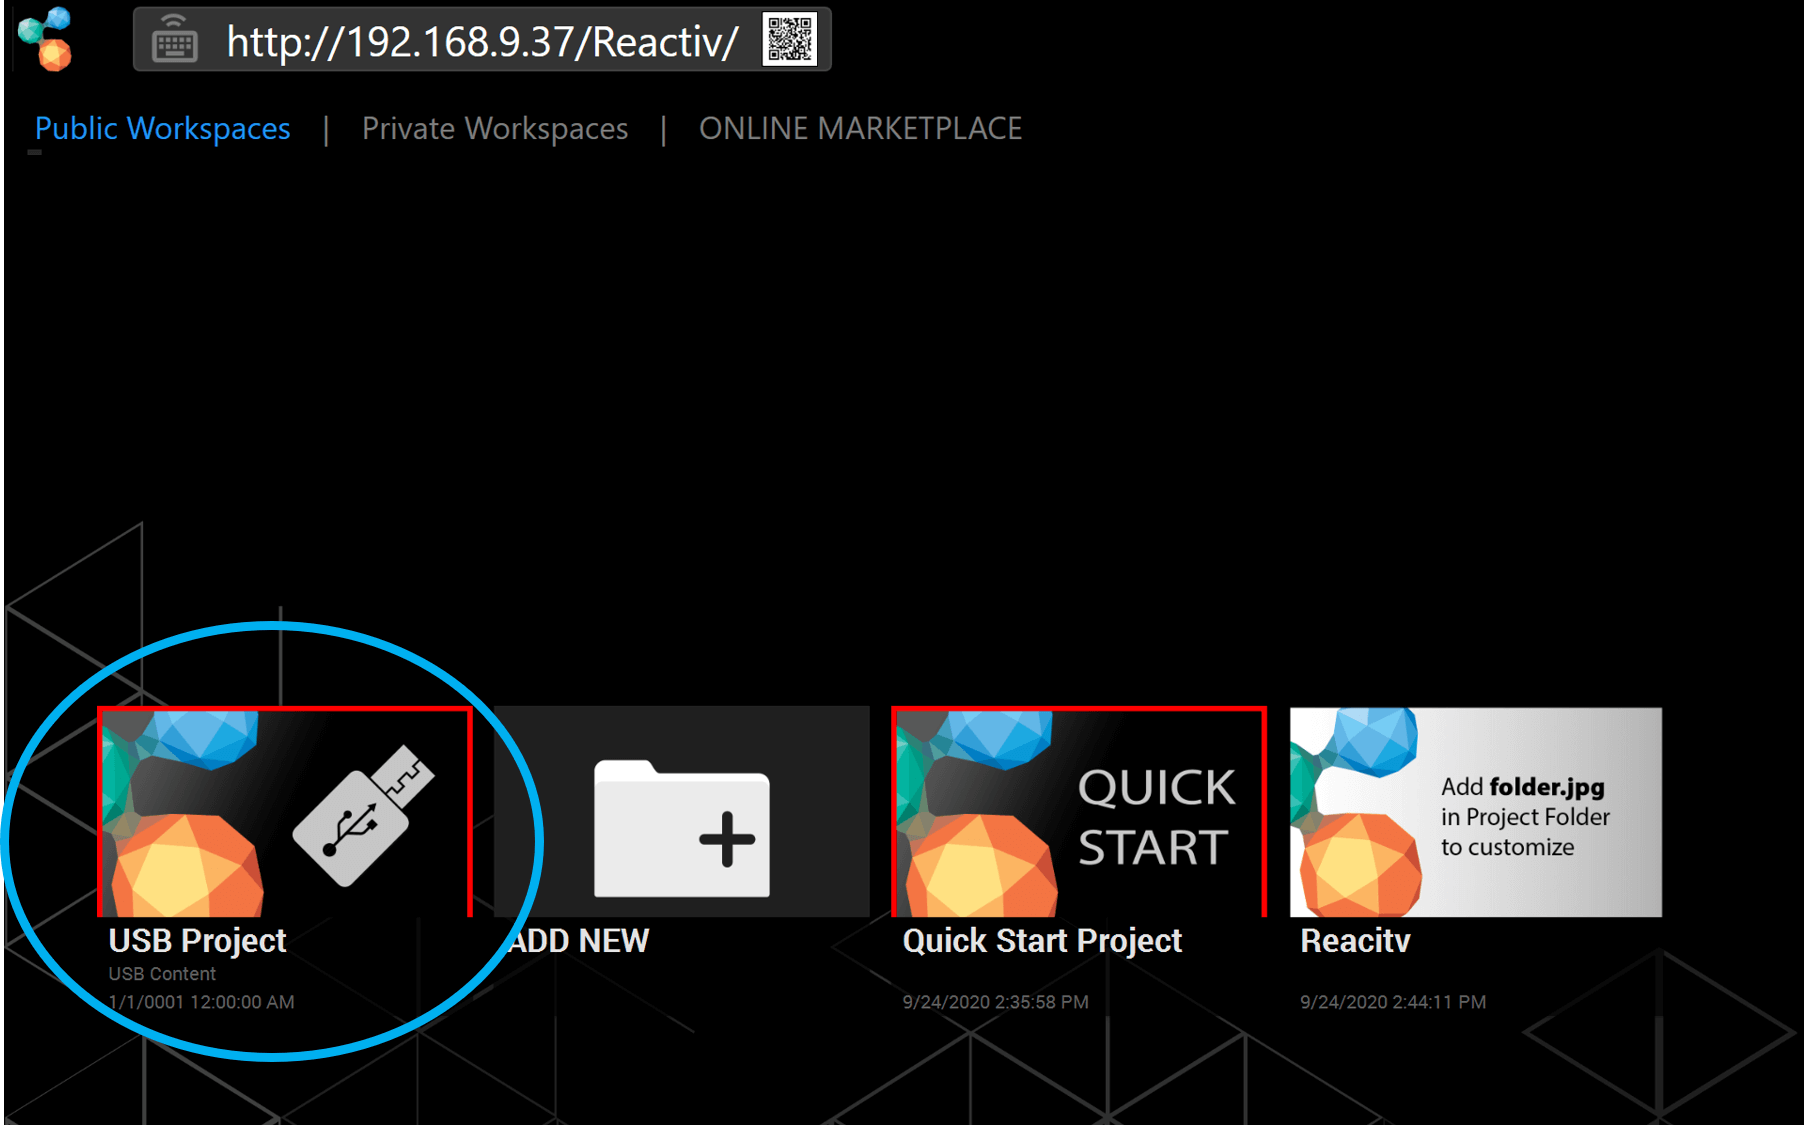
- Tart Reactiv STAGE or SCRIBBLE and go to the lobby.
- Click on the USB Project icon to start presenting.
Before your presentation/at your desk
- Open your presentation folder
- If you are using Chrome, navigate to the webpage you would like to use in Newline Reactiv SUITE, select the address in the address bar, click and drag it into your presentation folder, and create a URL file (shortcut to a webpage).
- If you are using another browser, in your presentation folder: Right click > New > Shortcut > past your webpage address > next > name your shortcut and click finish.
In Newline Reactiv SUITE/during your presentation
- Click on the browser icon

- Navigate to the webpage you would like to work on.
- Click on the “add to presentation” button located on the browser floating toolbar.
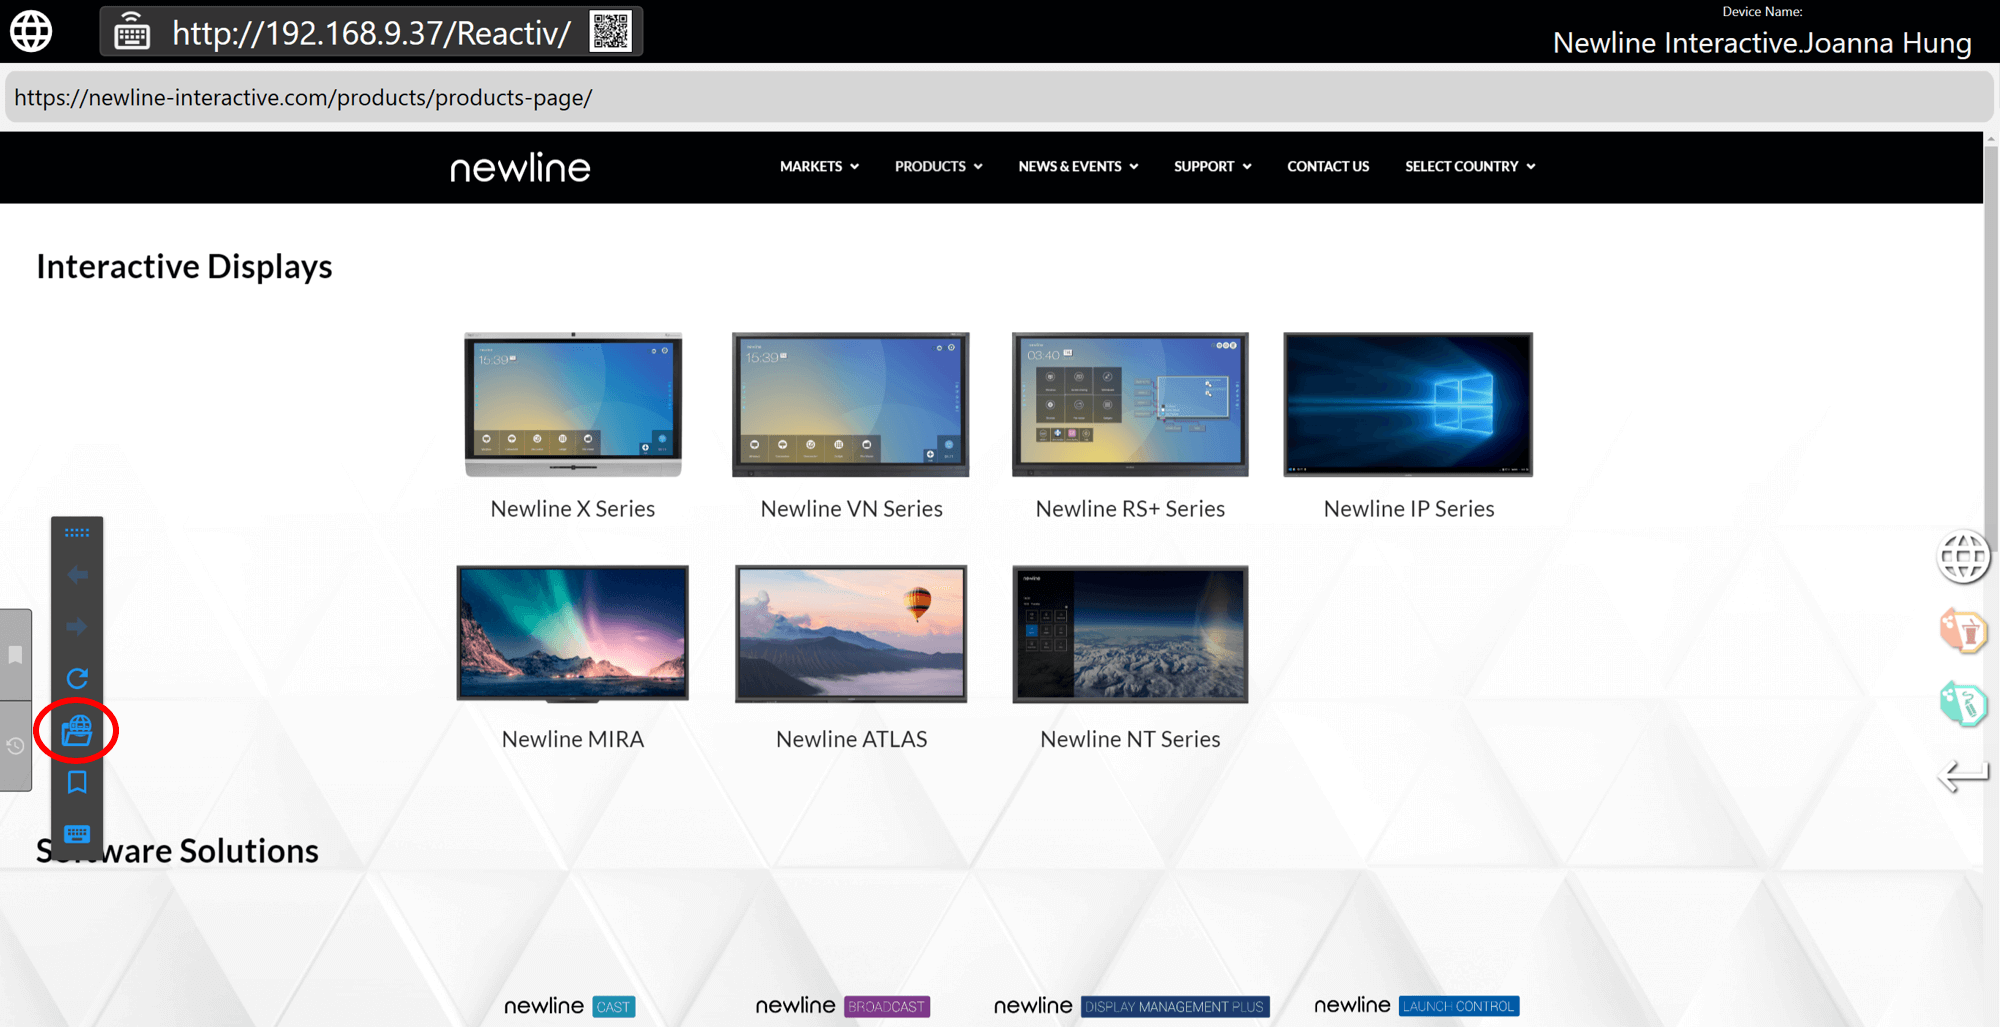
- The webpage will now be in your presentation folder so you can open it in STAGE and SCRIBBLE
Everything you present and save, during a session, will be saved back to the exact same folder as the originating file. On-premises or off-premises storage, Local drive, USB flash drive, network drive, or Cloud, data will only be saved to the location of your choice.
Reactiv STAGE is a powerful non-linear storytelling tool that enables teams to shift focus from managing content to the narrative of a presentation. STAGE allows you to open, render, markup, and present content in any format that you routinely use. Dramatically improves the speed and the accuracy of capturing audience feedback and meeting results.
At any time, click the “arrange” button at the bottom right corner of your screen to automatically arrange every object on the screen.

To clean your presentation screen, click the “remove all” button at the bottom right corner of your screen.

Native inking
STAGE allows teams to embed “native ink” into many different types of documents like Word or PowerPoint.
Native Inking saves your annotation “inside” the document, as a layer that can be edited and erased from inside Microsoft Office tools. Traditional tools save annotations as a non-editable PDF or “picture”, which can be reviewed but not easily edited.
No, saving a file will automatically create a copy, with your embedded annotations, and a time/date stamp will be appended to the filename so you can easily distinguish it later.
- Ink on videos will be saved as a screenshot with the frame number/timestamp.
- Ink on documents/images will be saved in their original file format.
- Ink on a web page will be saved as a screenshot.
- Inked files are saved back into the same folder as the original file.
Managing secondary displays in STAGE
Reactiv STAGE allow users to mirror a document or the entire workspace into up to 3 secondary displays.
To mirror a document or a device, throw it in the direction of the secondary display you want it to be mirrored in.
To mirror the entire workspace, click and hold the background, then throw it in the direction of the secondary screen.
- Throw the same document again, in the same direction, to remove it from the secondary display.
- Or throw a new document in the same direction to replace the first one.
- Make sure that you are throwing in the right direction. You need to throw the document in a specific direction as each direction (left/right/up) are different displays.
- Check Newline Reactiv SUITE settings and make sure that the secondary displays are correctly configured.
- Make sure that the object you are throwing is properly hitting the border of the screen and bounces back into position. If the object doesn’t properly hit the border of the screen it will not mirror.
Saving content in STAGE
You can save documents, with your annotations, by clicking on the save button, located on the STAGE toolbar. Just click on any content and the toolbar will appear.
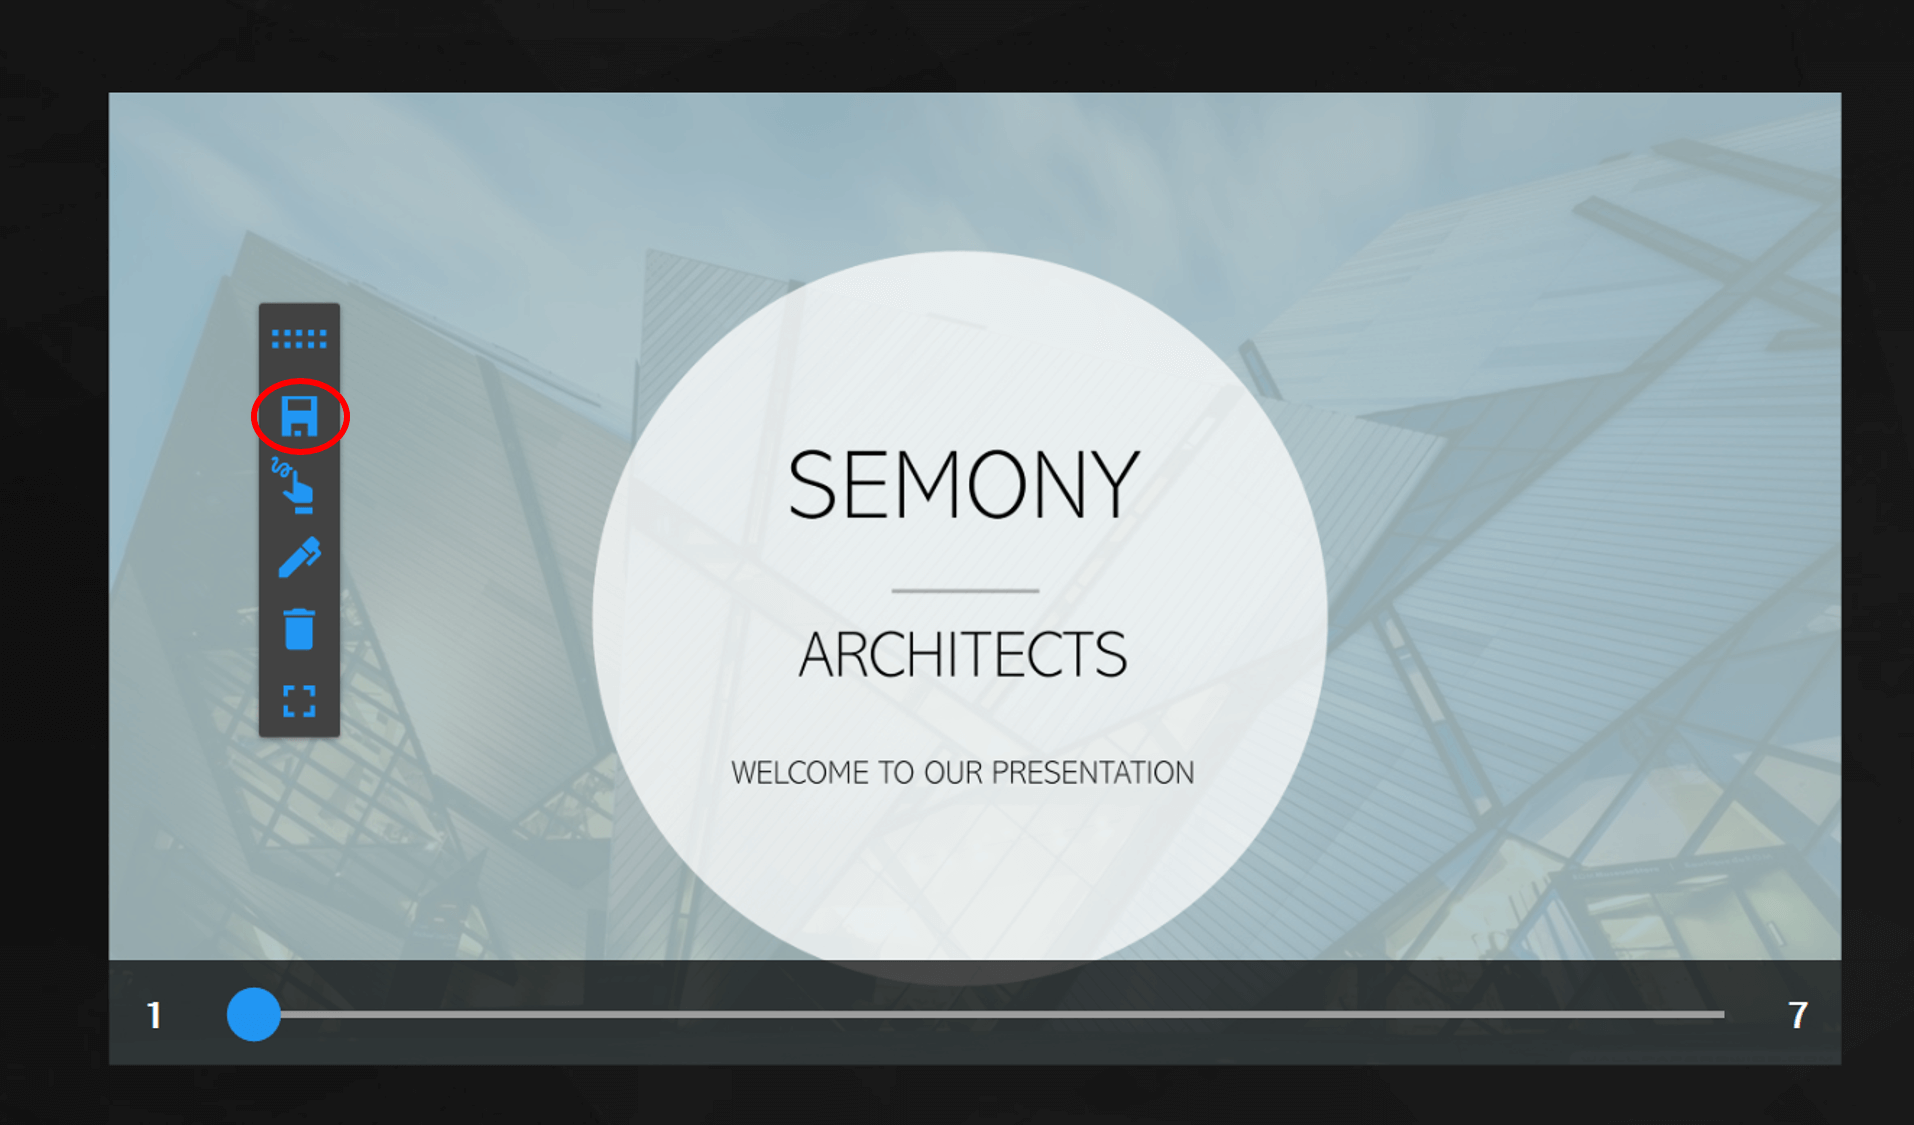
Reactiv STAGE will save files back into their original file format. Video screenshots, web screenshots will be saved as an image format. Microsoft office and PDF documents will be saved by in their original format with ink embedded inside them in an editable format.
Reactive SCRIBBLE saves the canvas using a proprietary file format. But, content can be paginated and exported to a PDF.
Reactiv SCRIBBLE is a breakthrough brainstorming and layout tool, that uses an infinite canvas, allowing you to sketch, write ideas, mark up pages and create dynamic layouts that accurately represent your vision.
SCRIBBLE simplifies complex ideas, visually communicates vision and intent, and allows your team to capture decisions and reduce mistakes.
When using smart feature, the insert path must cover the entire height/width of the objects/inking that you want to move, in order to select them. When selected properly, the content will be highlighted.
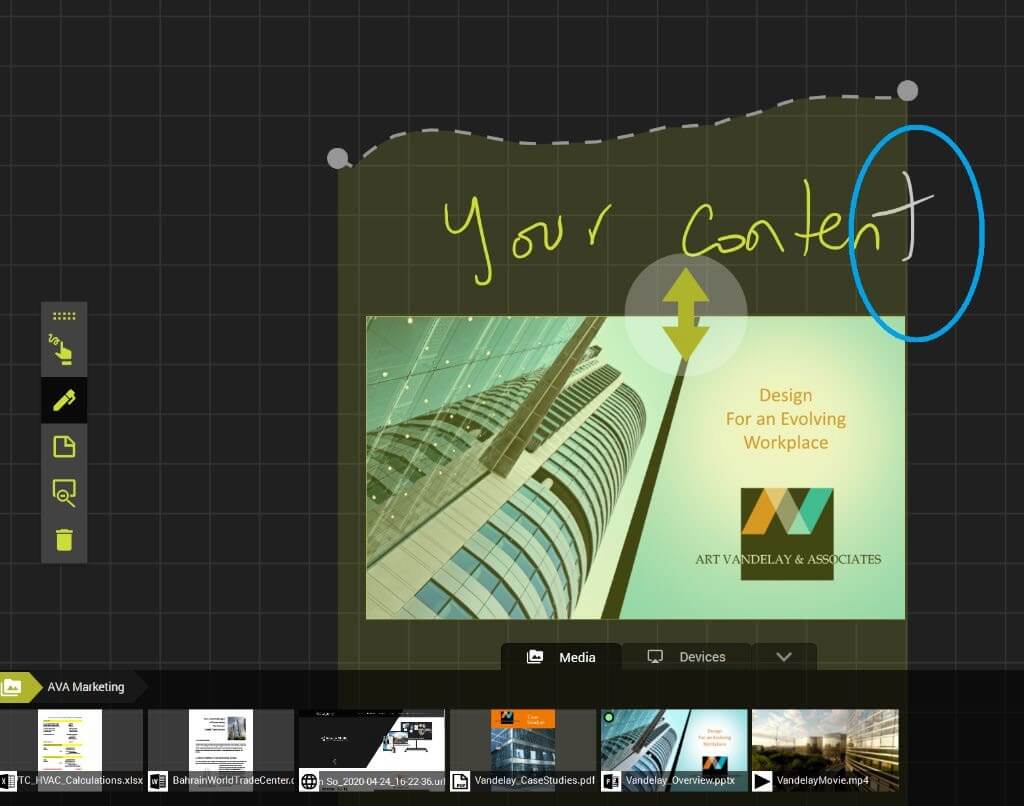
Using the Lasso tool, you can move and resize content on your canvas.
Double click on the canvas to activate the smart insert tool, and create a closed path to select everything inside the loop. Once the loop is closed, you can move the content around the canvas and resize it to re-organize the layout as you wish.
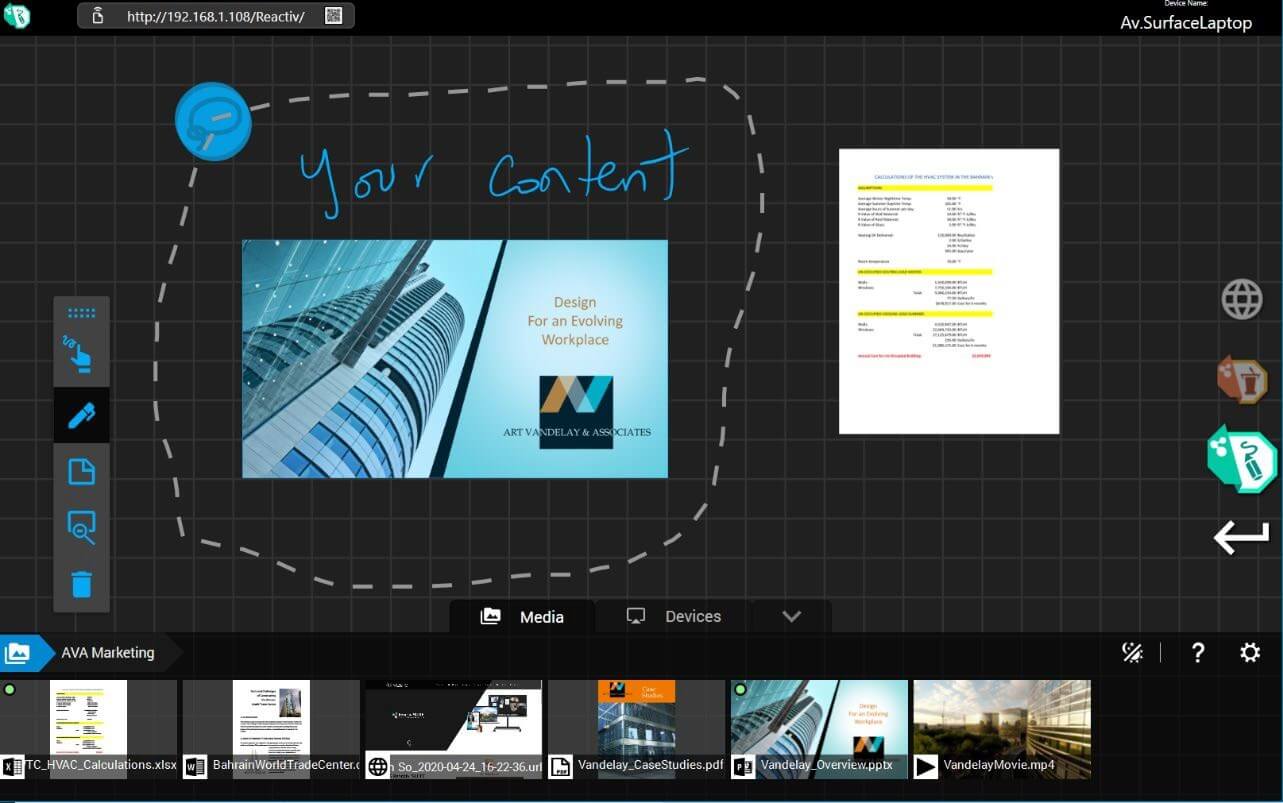
Reactiv SCRIBBLE
- Will auto-save your progress after every modification. You don’t have to worry about saving during your session, just focus on your work.
- You can also paginate your canvas into individual pages, and export to PDF.
Paginating and sharing content
- Use the pagination tool to create page breaks from any part of the canvas that you would like to share. Then simply export these pages breaks into a PDF.
- Once the PDF created, it will be in your presentation folder so you can share it easily.
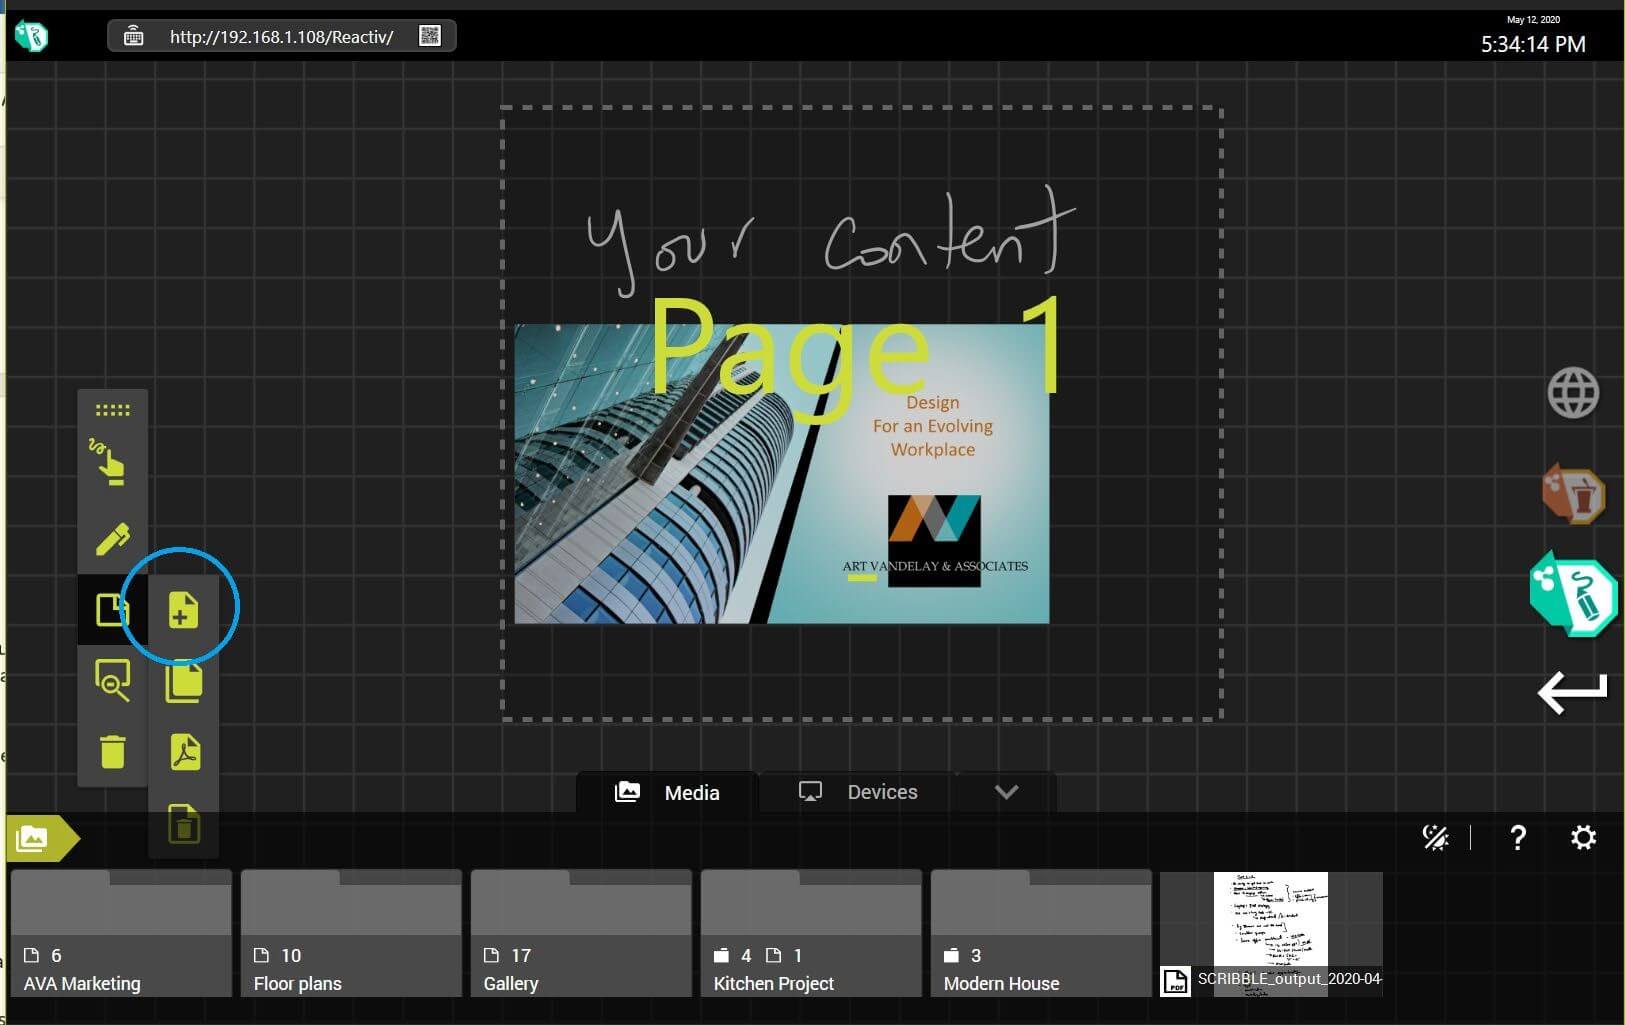
Once a page break is defined, you must click “create page” button again. Every time you want to add a new page, this button must be clicked again.
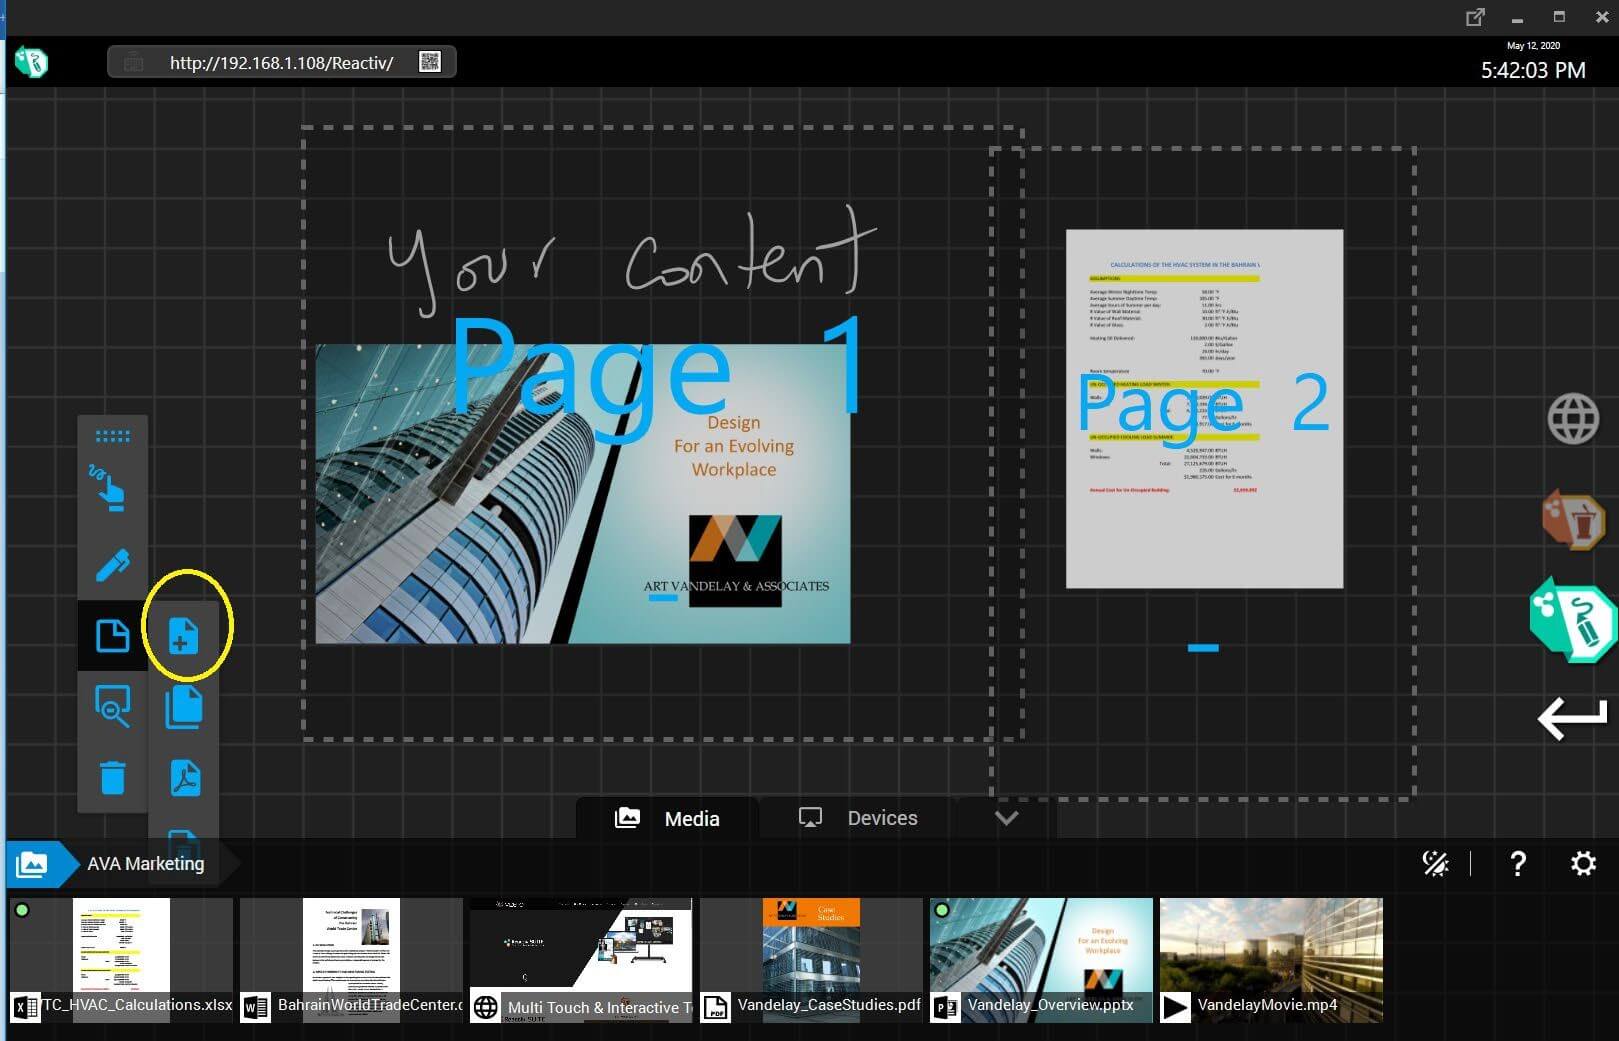
Managing secondary displays in SCRIBBLE
Reactiv SCRIBBLE allow users to mirror a paginated area, or the entire workspace into up to 3 secondary displays:
- To mirror a page, click & hold and throw it in the direction of the secondary display you want it to be mirrored in.
- To mirror the entire workspace, click and hold the canvas, then throw it in the direction of the secondary screen.
Reactiv SCRIBBLE is all about layout. It will allow you to mirror a specific layout defined by a page break. You cannot mirror just a single document – if you want to mirror a document, do that in STAGE.
To mirror the entire workspace, click and hold the background, then throw it in the direction of the secondary screen.
- Throw the same page again, in the same direction, to remove it from the secondary display.
- Or throw a new document in the same direction to replace the first one.
Make sure that you are throwing in the right direction. You need to throw the content in a specific direction as each direction (left/right/up) are different displays.
Check Reactiv SUITE settings and make sure that the secondary displays are correctly configured.
Make sure that the object you are throwing is properly hitting the border of the screen and bounces back into position. If the object doesn’t properly hit the border of the screen it will not mirror.
Integrated services that seamlessly connect in-room devices into the Newline Reactiv SUITE eco-system.
Remote CONNECT allows colleagues and attendees to interact with Newline display using their personal devices. They can share files with Newline Reactiv SUITE, cast their device’s screen into it, or use their devices as keyboards for the display.
In-room compatible devices such as laptops, mobiles and tablets can be cast to Newline Reactiv SUITE using built-in Airplay and Miracast capabilities.
Which devices can I cast from?
- Airplay: You can cast from iPhone, iPad, iPod Touch, MacBook, iMac, Mac mini, etc.
- Miracast: You can cast from certain Android devices (Samsung and other phone/tablet which support Miracast) or Windows 10 PCs (using in-built Miracast capabilities).
- Chromecast: You can cast from various Google Chromebooks and other Android devices that support Chromecast.
In Reactiv SUITE
Ensure that Airplay, Miracast and/or Chromecast are enabled in Reactiv SUITE settings. Once a device is paired, it will appear in STAGE and SCRIBBLE in the library, under the “Devices” tab.
On your device
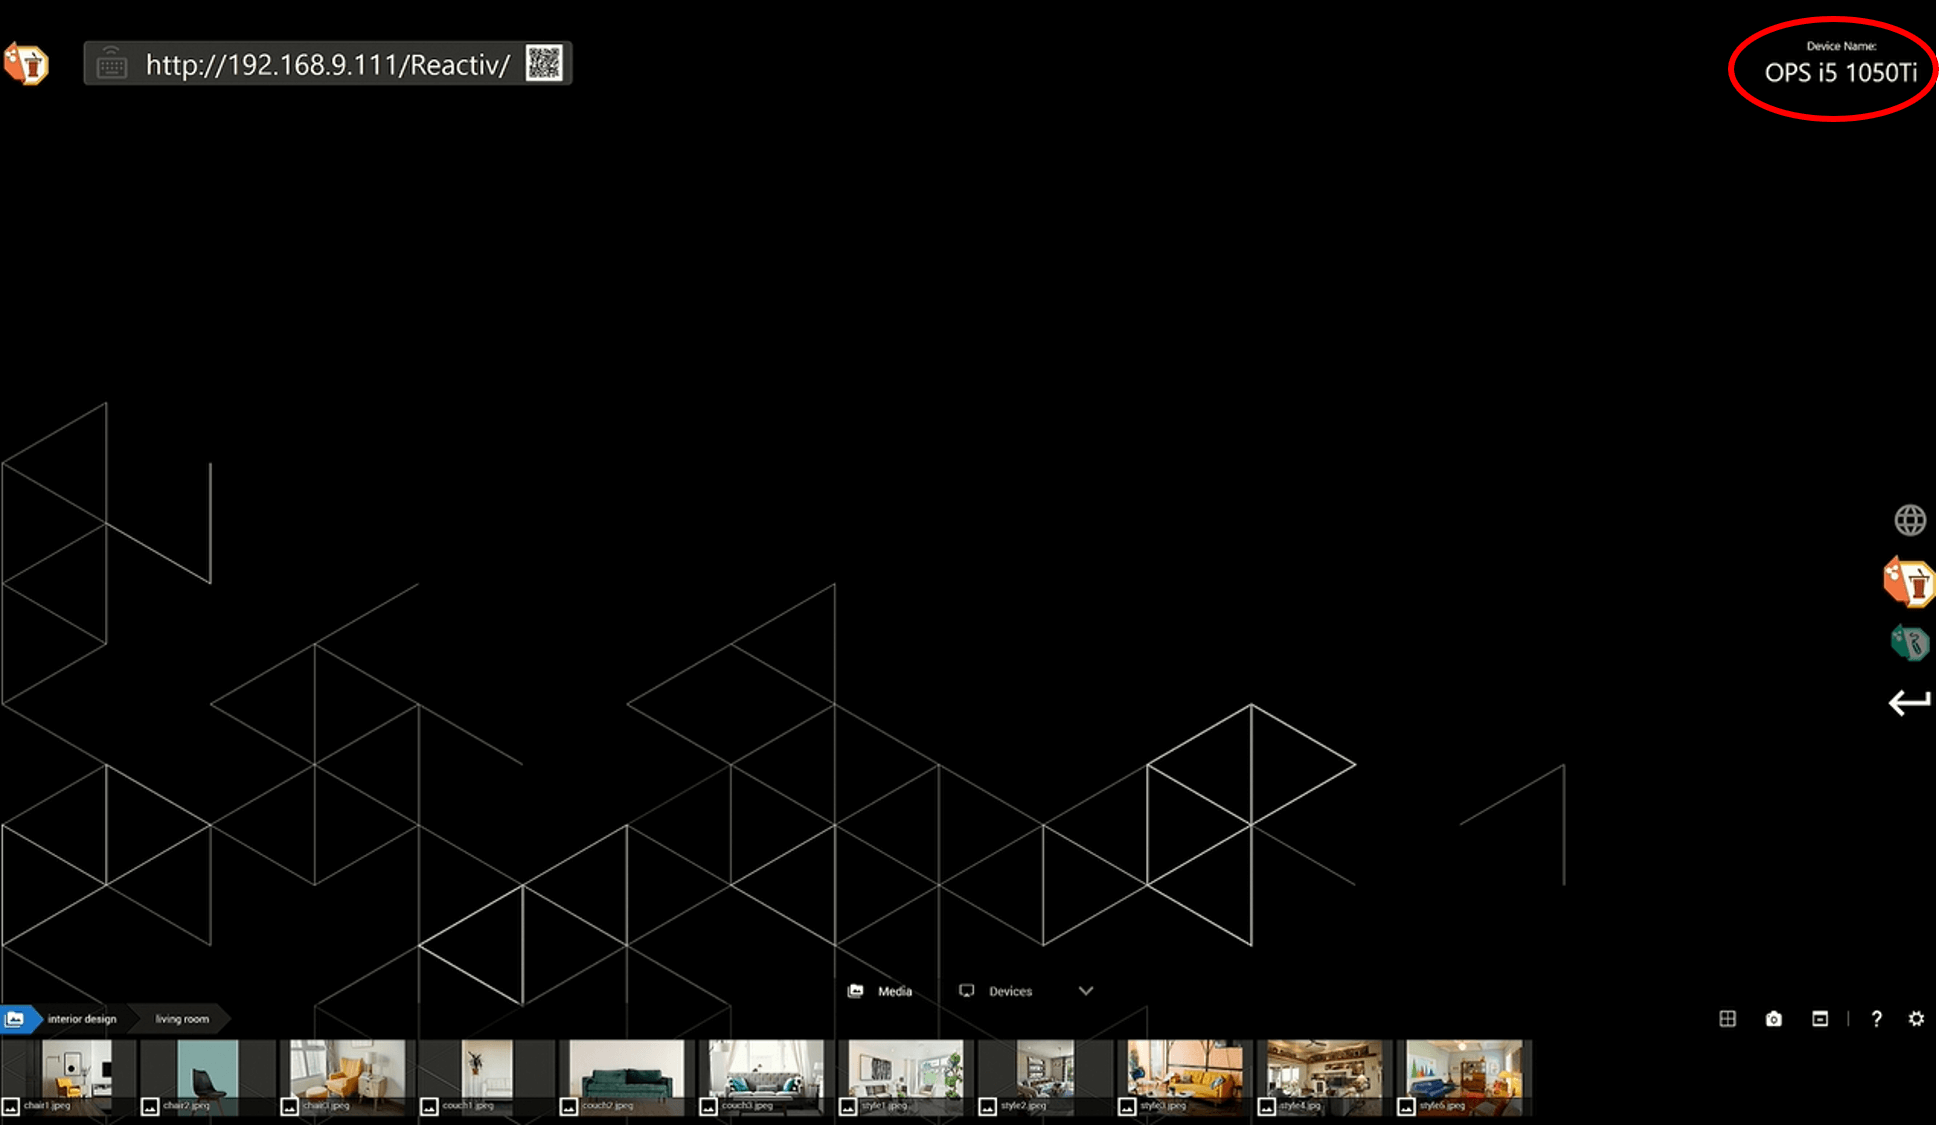
Open the appropriate casting application on your device. Search for the Device Name in the list and connect to it. The Device Name is displayed in the top right-hand corner of Newline Reactiv SUITE status bar.
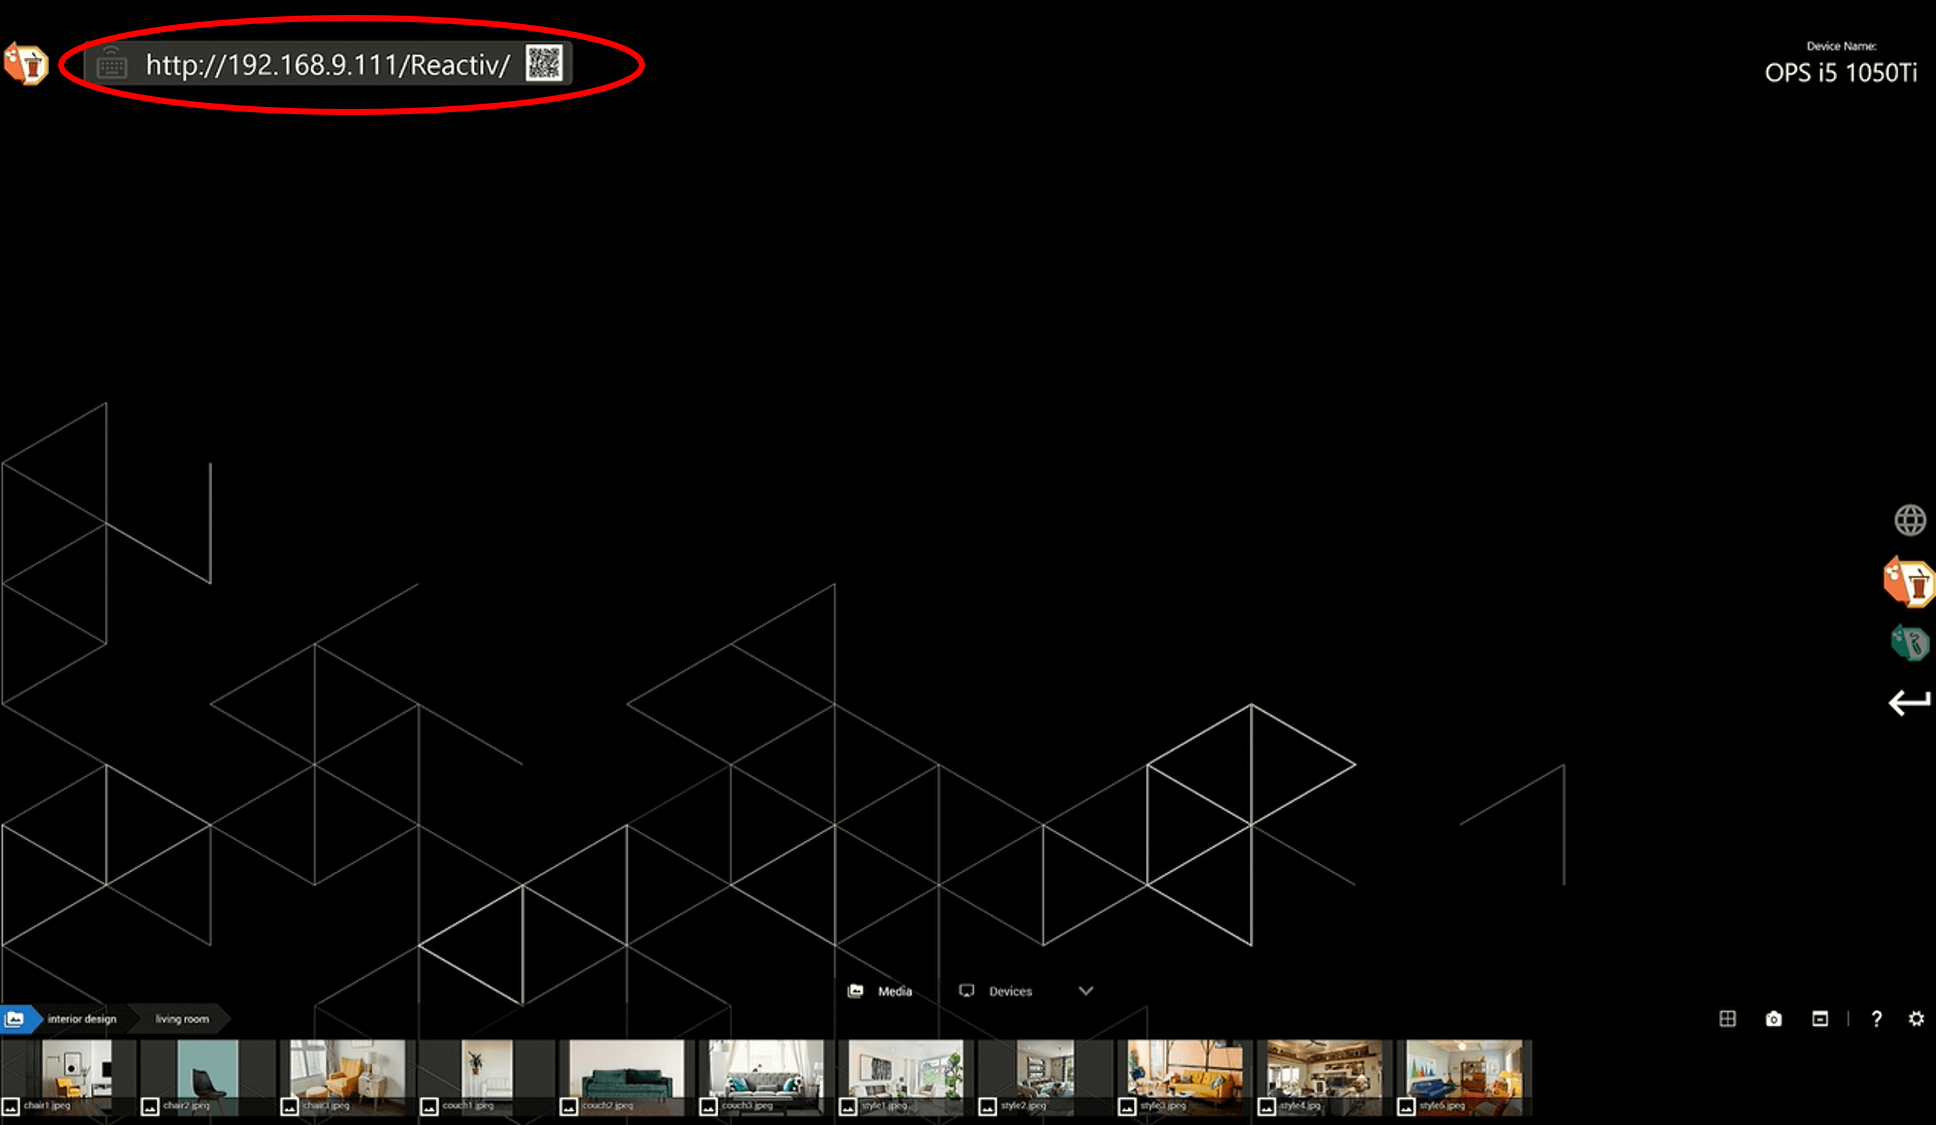
Team members present in the room can wirelessly send any file to Newline Reactiv SUITE by opening the URL displayed in the top left-hand corner of the Reactiv status bar, using any browser on their personal device. Follow the instructions on the browser to upload files directly into the active digital workspace.
For more information, refer to the Getting Started Guide.
Reactiv enables you to discreetly share text or complex weblinks from your remote device into the Reactiv Workspace. Just open the URL displayed in the top left corner of the Reactiv status bar on any in-room personal device. Follow the instructions to send URL link directly into Newline Reactiv SUITE.
Airplay Detailed FAQ (Apple Devices)
Yes, Airplay requires both the personal, in-room device and the Newline Reactiv SUITE host PC to be on the same network for screen sharing to work.
- On iOS, open the control center and click on “Screen Mirroring”.
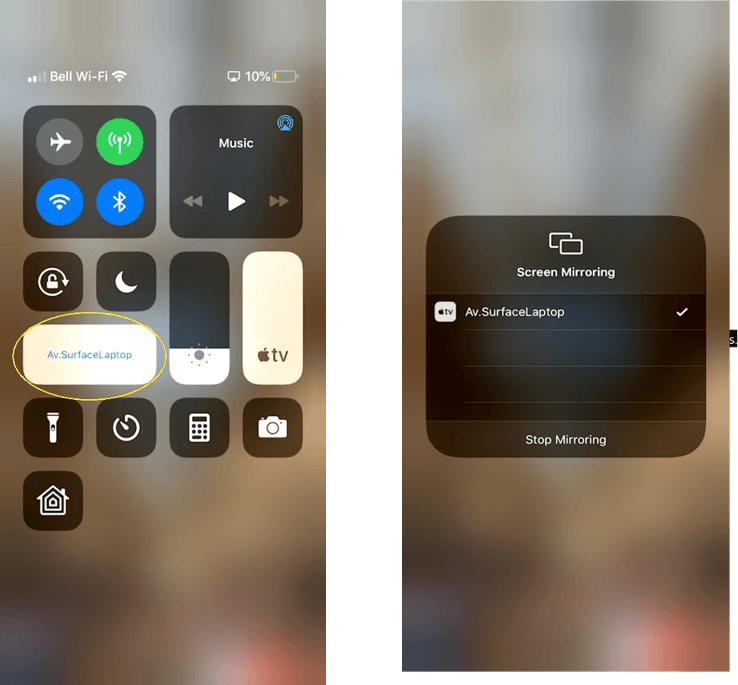
- On macOS, click on the Airplay icon in the menu bar.
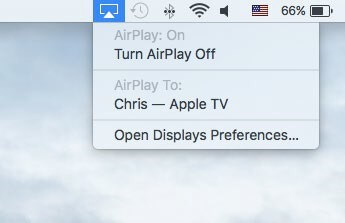
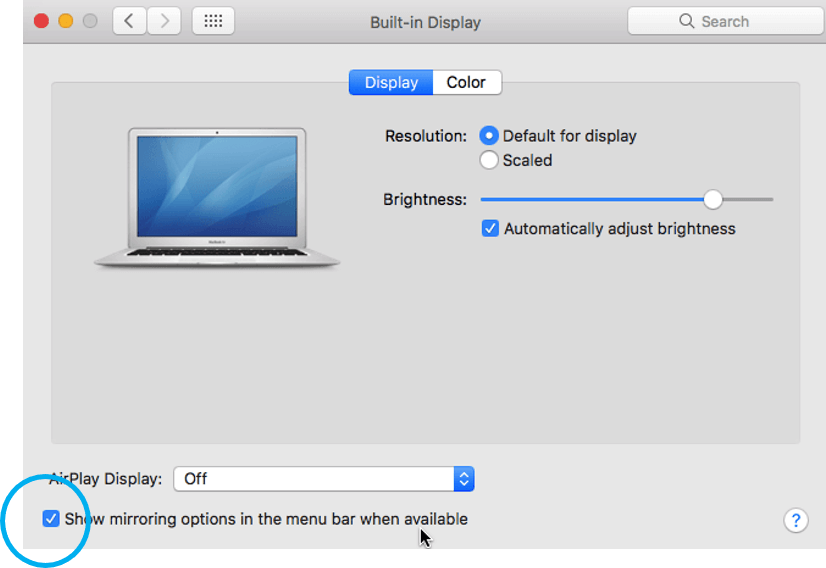
- On macOS, verify that Airplay is enabled in System preferences→ Displays → “Show mirroring option in the menu bar”.
- On iOS, verify that the OS is up to date.
- Verify that your iPhone/iPad and the Newline Reactiv SUITE device are on the same network.
- Verify in Newline Reactiv SUITE settings that Airplay is enabled.
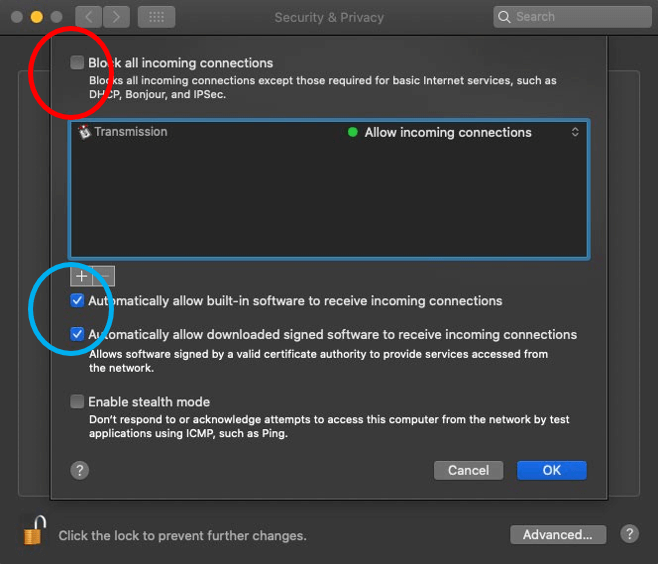
- On macOS, verify that incoming connections are not blocked.
- Go to “System Preferences” → ”Security and Privacy” → Firewall → ”Firewall Options”, deselect “Block All incoming Connections”, and select “Automatically allow downloaded signed software to receive incoming connections” if it’s not already selected.
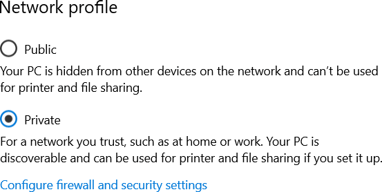
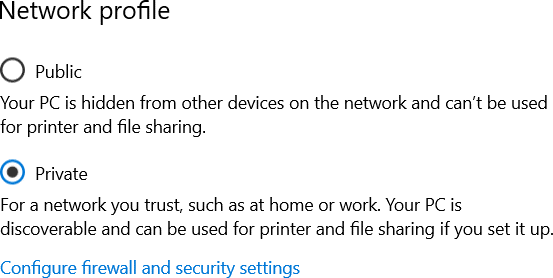
- On the OPS, confirm that the Wi-Fi\Network connection is configured as a PRIVATE network. The PC must be discoverable for Airplay to work.
- On the OPS, confirm that the firewall is configured to accept incoming connections.
- On the OPS, confirm that the WiFi/Network connection is configured as a PRIVATE network. The OPS must be discoverable in order for Miracast to work.

- On the OPS, confirm that the firewall is configured to accept incoming connections.
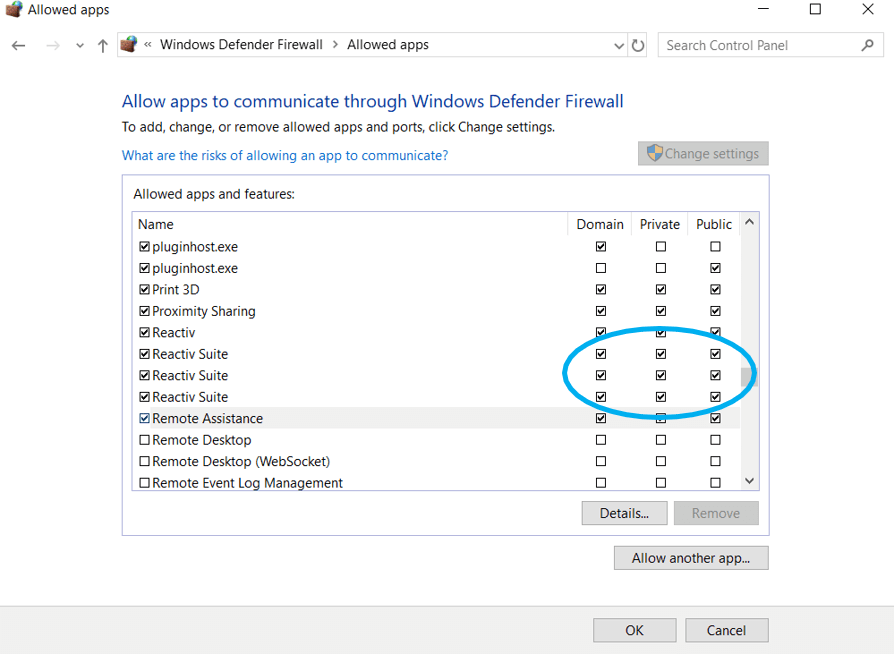
Please check the DNS setting (in network settings) of the OPS running Newline Reactiv SUITE. You can try using alternative DNS like Google’s free DNS 8.8.8.8 and 8.8.4.4.
Newline Reactiv SUITE Airplay connectivity supports playback of videos using H.264 video codec and AAC audio codec. If the videos use any other format, they might not work.
If you are using a wifi connection, the wifi signal might be weak, or your network might be overloaded.
- Ensure a good signal between Newline Reactiv SUITE host OPS and the in-room device attempting to cast.
- If possible, use a wired Ethernet cable instead of WiFi to connect the Newline Reactiv SUITE host and macOS device to the network.
- In some cases, switching off Bluetooth on in-room iOS devices can help to get a better connection.
Once the screen is cast, the volume is controlled through Newline Reactiv SUITE and not the in-room device.
Miracast Detailed FAQ (Windows & Android Devices)
No, Miracast utilizes WiDi which doesn’t require the casting and receiving devices to be on the same network. As a result, any device in the room that supports Miracast will see the Newline Reactiv SUITE Miracast server and can connect directly.
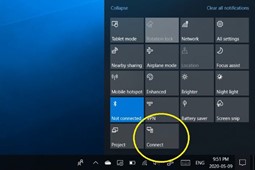
- On a Windows 10 device, click on the CONNECT icon and search for the Newline Reactiv SUITE Device Name. Select this device and pick the projection mode.
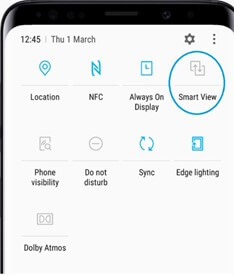
- On many Android and Samsung devices, in the Quick Settings menu open the Smart View app. Search for the Newline Reactiv SUITE device name and follow instructions.
- Make sure that Newline Reactiv SUITE PC has a valid WiFi adapter and it is turned on. Miracast requires WiFi connectivity with WiDi support. Airplane Mode must not be turned on.
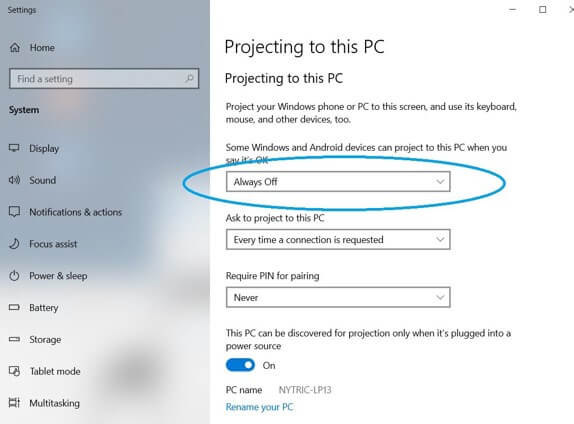
- On the OPS, go to “Projection Settings” and “Some Windows and Android devices can project to this PC when it is OK”, should be set to “Always Off” from the dropdown menu.
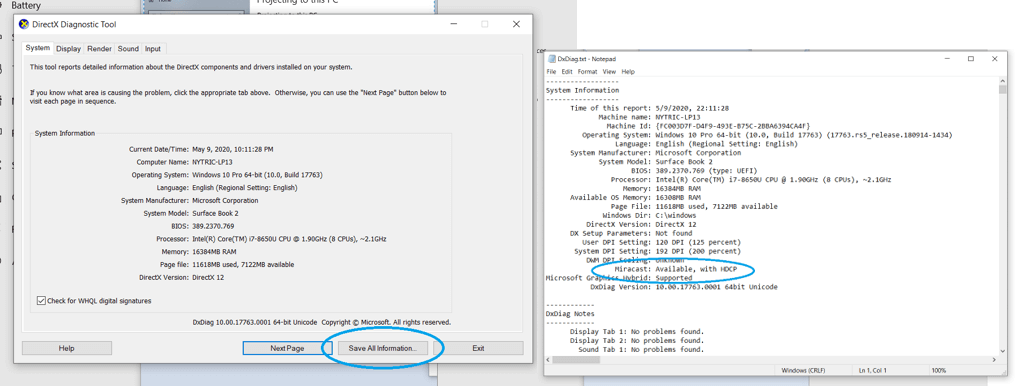
- Confirm that the OS and WiDi adapter support Miracast.
- On the OPS, type ‘dxdiag’ in the Windows search box
- Click ‘Save All Information’ and save the resulting file
- Open this DxDiag.txt file and confirm that Miracast is available
- On the OPS, confirm that the WiFi\Network connection is configured as a PRIVATE network. The OPS must be discoverable in order for Miracast to work.

- On the OPS, confirm that the firewall is configured to accept incoming connections.
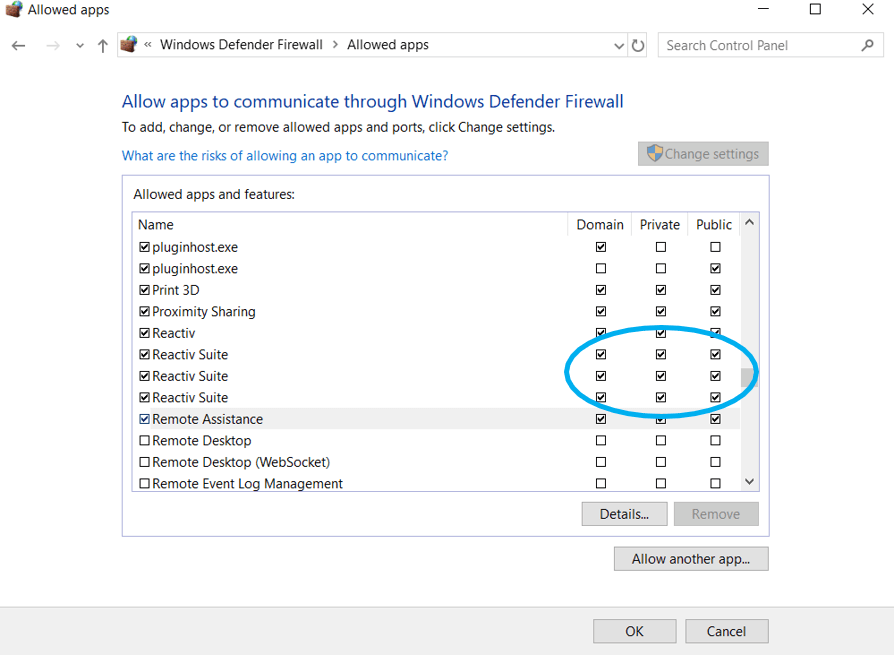
That is to be expected, Miracast defaults to a 16:9 aspect ratio by default.
Chromecast Detailed FAQ (Chromebooks & Android Devices)
Yes, Chromecast requires both the personal, in-room device and the Newline Reactiv SUITE host OPS to be on the same network for screen sharing to work.
- Make sure your mobile phone or tablet is on the same Wi-Fi network as your Chromecast device.
- Open the Google Home app.
- Tap the device you want to cast your screen to.
- Tap Cast my screen > Cast screen.
FileDrop Detailed FAQ
- Make sure that both your in-room device and your OPS are on the same network.
- On the OPS, confirm that the WiFi/Network connection is configured as a PRIVATE network. OPS IP must be discoverable.
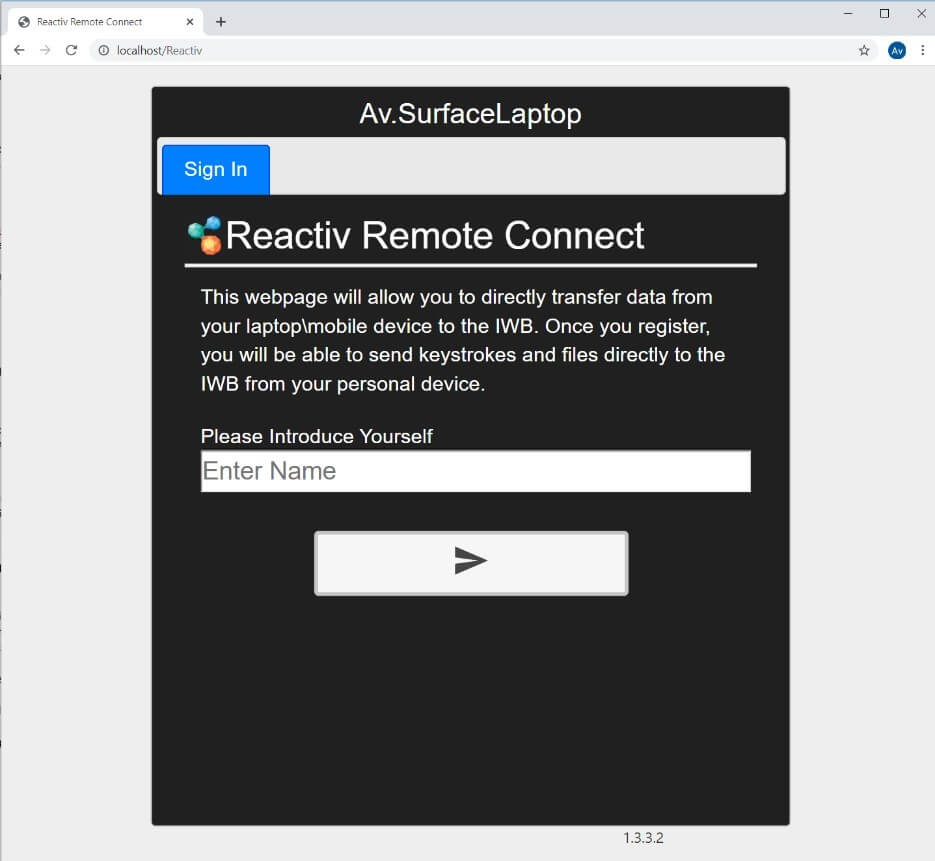
- On the OPS, open a browser and type: “Localhost\Reactiv” in the search bar to confirm that the Reactiv Webserver is working.
- On the OPS, Reactiv webserver rely on port 80, and while it is normally open by default, you can create a new firewall rule to open it:
- “Windows Defender Firewall” → “Advanced settings” → “Inbound Rules” → “New Rules”. Select “Port”, click Next.
- Now select “TCP” and “Specific Port numbers” set it to 80.
- Click Next and select “Allow the Connection”.
- Click Next and select all 3 boxes “Domain”, Public” and “Private”. Click Next, give a name to the new rule.
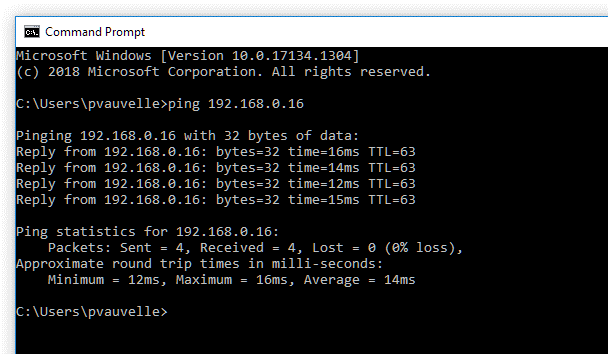
- From a Windows device on the same network: Ping the Reactiv Webserver IP address to see if it is reachable:
- In windows, open Command Prompt by hitting Windows+R and typing “cmd” in the run bar, then hit enter.
- In Command Prompt, type “ping reactiv_ip_address”.
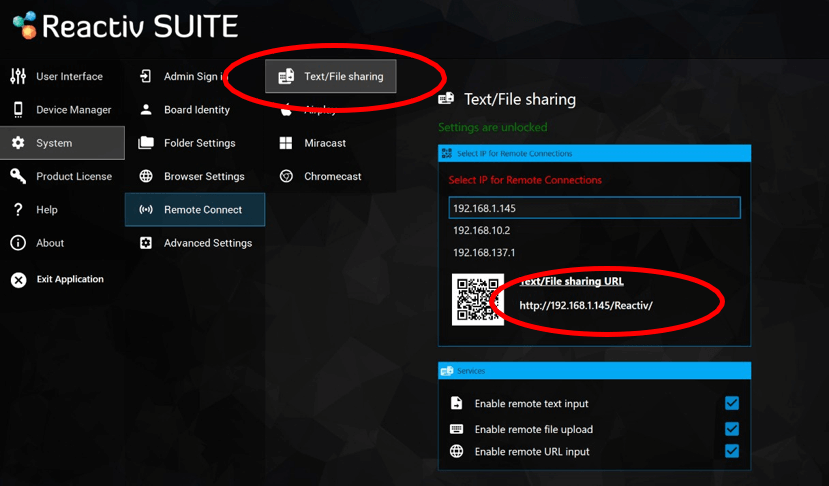
Newline Reactiv SUITE creates a webserver on the OPS in order for in-room devices to connect and transfer information. But the OPS could have multiple IP addresses due to multiple network adapters. An example is connecting WiFi and LAN cable to the OPS, which will create two IP addresses for the same OPS.
If the IP address displayed in the status bar is incorrect, you can use the Settings > System > Remote Connect > Text/File Sharing menu to pick the correct IP address.
Using in-room devices as keyboard for the interactive display is a feature only available for display using ShadowSense touchscreen technology, as Newline Reactiv SUITE leverage specific internal connections only available with display powered by ShadowSense.
- Open Newline Reactiv SUITE settings → Device Manager → Touch Screen, if “ShadowSense not detected is displayed, then Remote Keyboard feature won’t work.
- If the display is powered by ShadowSense, make sure that the ShadowSense Firmware is R11.0 or higher.
- If the Firmware is bellow r11.0, update it to the latest disponible firmware by clicking on “firmware update” and following the instructions.
